How to build a Random User Generator App using Random User API?

Sun Feb 20 2022

10 min read

More often than not, when you are developing an application, you have to implement user authentication. Instead of creating all the data yourself, you can build a small app that can generate fake user data.

Today, I will build a random user generator app to generate random fake user data. So without any further ado, let’s jump in!

Stack

We need to choose a stack first to build this application. I have decided to go with the Jamstack.

I am going to use Next.js for the client-side and TailwindCSS for the styling.

If you don’t know about Next.js, it is a JavaScript framework built on top of React and provides features like server-side rendering, static site generation, etc. Tailwind is a CSS framework that provides utility classes to speed up the development process.

Choosing The API

Let’s find an API that we can use to generate the user information. Go to RapidAPI Hub and create an account if you haven’t already and then search for “random user api” in the search section.

Loading component...

You will see different search results related to all the available random user APIs. For this app, I am using Random User API.

To use this API, you need to subscribe to it first. You can do this by clicking on Subscribe to Test button.

Once you click the button, you will be redirected to another page where different available subscription packages will be shown. Let’s go with the free one for now.

After all this, you will be redirected back to the original page. Here you will have a key x-rapidapi-key. Save it somewhere. It will be used later in the application.

Building The UI

You can create a Next.js boilerplate with TailwindCSS integrated by running the following command in your terminal. So let’s do that.

sh
npx create-next-app -e with-tailwindcss random-user-generator-app

This command is going to take a minute to set everything up. After generating the boilerplate, you will see a folder with the name random-user-generator-app has been created. Open this folder in your preferred code editor. I will use VSCode for this project.

Project Files

When you open the project in your code editor, you will see the following directories and files in the root directory:

  • pages directory: Inside it, you will have files index.js, _app.js, and another directory called api. You only need to know about the - - index.js file that is the main entry point in your project.
  • public directory: This directory contains icons. You place your static files here to load later in the application.
  • node_modules: It’s another directory that contains all the node modules you are using in your application.
  • package.json: This file contains the metadata of your project.
  • package-lock.json: This file is responsible for tracking the exact version of every installed package.
  • postcss.config.js: This file contains PostCSS configurations.
  • tailwind.config.js: It contains TailwindCSS configurations.
  • readme.md: It’s a markdown file for documentation.

Before we move on to writing the code, open this file, and copy all of its content, then paste it inside the tailwind.config.js file in your project. These are some TailwindCSS configurations I have done specifically for this project. I have added some colors that you do not have by default with TailwindCSS and set some screen sizes.

Now create a file called next.config.js and paste all the content from here to this file. We are doing this because the API will provide us with the image URLs. We will use the Next.js Image component to render the image, and this component needs a domain property in the next.config.js file to render an image from a URL.

Now let’s start writing the code. I am going to do it in steps so you can follow along.

→ STEP #1

Open the pages/index.js file and remove all the existing code. After this, copy-paste the following code there:

js
export default function Home() {
return (
<div className="flex flex-col items-center relative min-h-screen">
<h2 className="font-raleway font-bold text-center text-6xl text-primary pt-20 pb-6 md:text-3xl">
Random <span className="text-secondary">User</span> Generator
App
</h2>
<h3 className="text-lightGrey text-2xl font-raleway font-bold uppercase tracking-wide mb-12 md:text-base md:px-4 md:text-center">
Instantly generate a random user data
</h3>
</div>
);
}

It will create two headings for you with the text “Random User Generator App” and “Instantly generate a random user data”. You can change it to anything you prefer.

→ STEP #2

Now let’s create a generate button. The user will be able to use the search button to get the fake user data.

For this, copy the following code and paste it in pages/index.js:

jsx
export default function Home() {
return (
<div className="flex flex-col items-center relative min-h-screen">
<h2 className="font-raleway font-bold text-center text-6xl text-primary pt-20 pb-6 md:text-3xl">
Random <span className="text-secondary">User</span> Generator
App
</h2>
<h3 className="text-lightGrey text-2xl font-raleway font-bold uppercase tracking-wide mb-12 md:text-base md:px-4 md:text-center">
Instantly generate a random user data
</h3>
<div className="flex justify-center items-center w-full">
<button className="outline-none border border-danger text-primary font-bold font-raleway ml-4 w-52 px-12 py-2 rounded-sm bg-danger text-primary transition duration-300 hover:bg-bc hover:text-primary md:ml-0 md:mt-4">
Generate
</button>
</div>
</div>
);
}

This code is going to create an input field and button. I have also styled them a little bit using TailwindCSS.

→ STEP #3

Let’s create some states to store the fake user information we will receive from the API. For this, copy-paste the following code in pages/index.js.

jsx
export default function Home() {
const [userData, setUserData] = useState(value.results[0]);
return (
<div className="flex flex-col items-center relative min-h-screen">
<h2 className="font-raleway font-bold text-center text-6xl text-primary pt-20 pb-6 md:text-3xl">
Random <span className="text-secondary">User</span> Generator
App
</h2>
<h3 className="text-lightGrey text-2xl font-raleway font-bold uppercase tracking-wide mb-12 md:text-base md:px-4 md:text-center">
Instantly generate a random user data
</h3>
<div className="flex justify-center items-center w-full">
<button className="outline-none border border-danger text-primary font-bold font-raleway ml-4 w-52 px-12 py-2 rounded-sm bg-danger text-primary transition duration-300 hover:bg-bc hover:text-primary md:ml-0 md:mt-4">
Generate
</button>
</div>
</div>
);
}

→ STEP #4

Let’s integrate the API now. For this, first, create a .env.local file and paste the following in it:

sh
NEXT_PUBLIC_RAPIDAPI_KEY=YOUR-RAPIDAPI-KEY

You need to replace YOUR-RAPIDAPI-KEY here with the API key you got when you subscribed to the Random User API. It is the value of x-rapidapi-key that you saved earlier.

Now download and add axios to your project. For this, run the following command in the terminal:

sh
npm install axios

Now import axios at the top of the pages/index.js.

js
import axios from 'axios';

→ STEP #5

RapidAPI Hub provides you with code snippets in different languages for integrating the API. I am going to use the (JavaScript) Axios one.

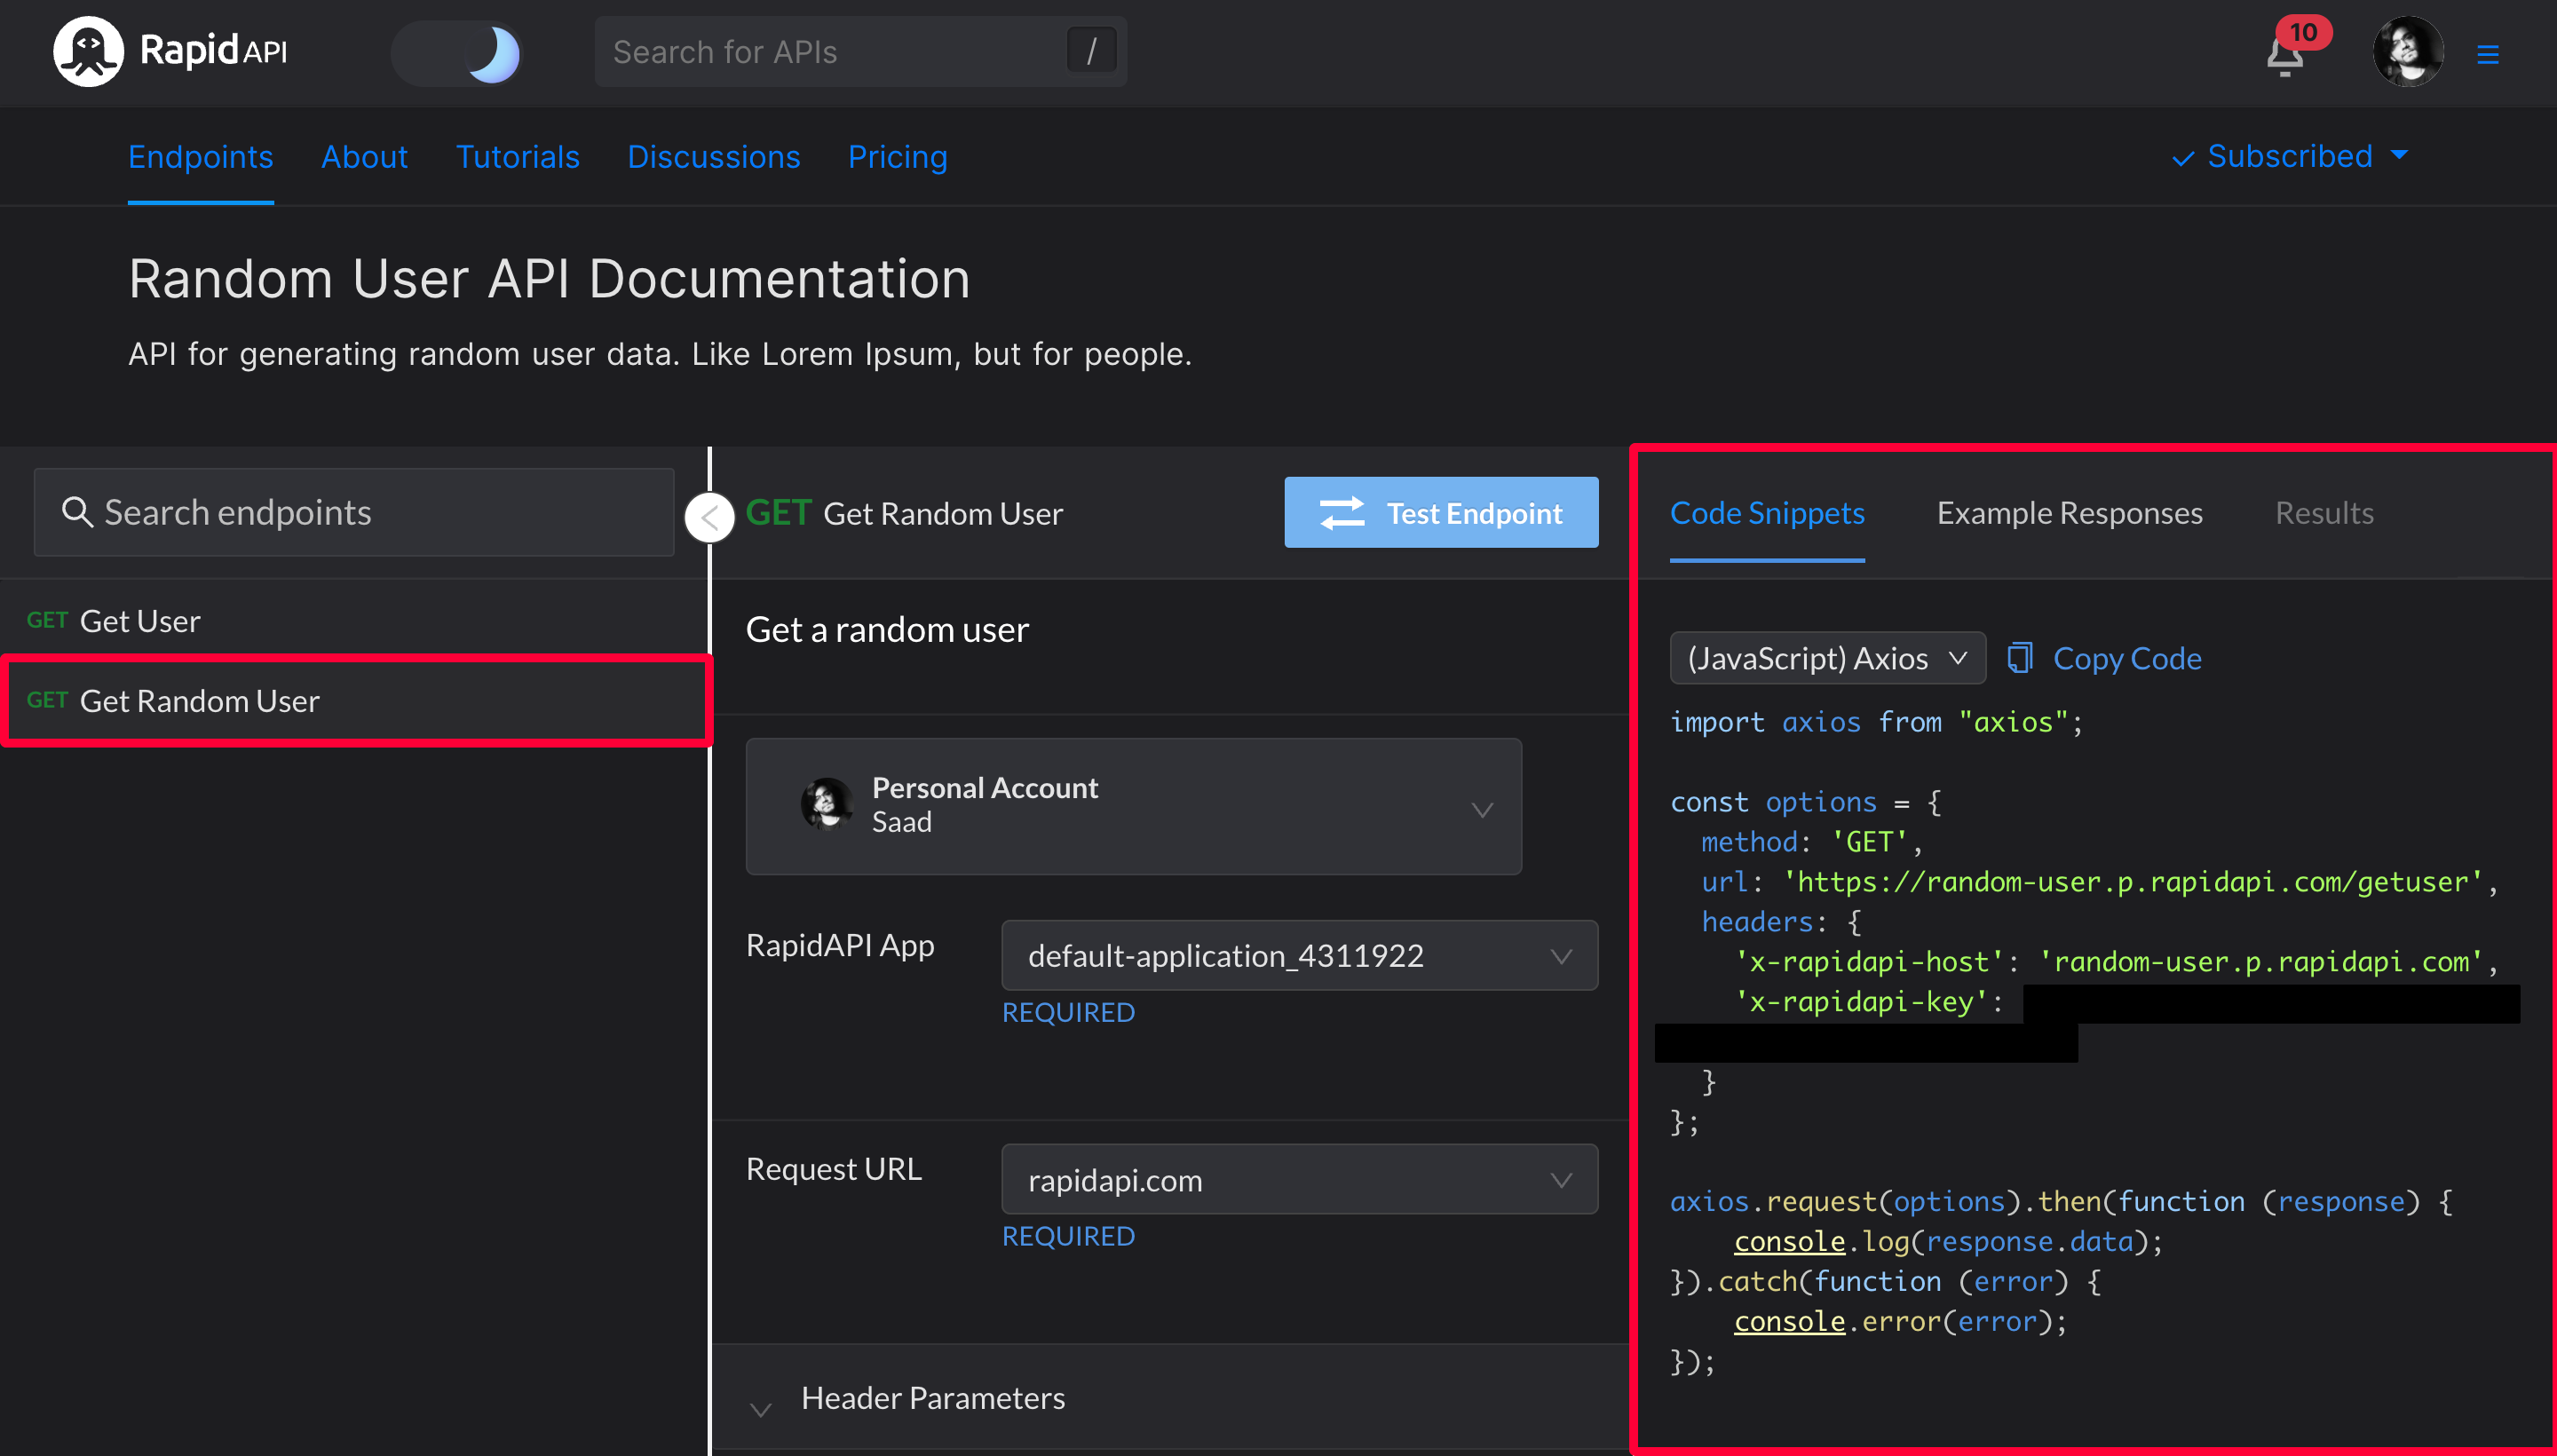
Now create a file with the name user.js inside the pages/api directory. It is going to create a REST API endpoint for you. The endpoint point will look like this:

sh
http://localhost:3000/api/user

Now copy the following code in this file:

js
import axios from 'axios';
export default function handler(req, res) {
if (req.method === 'GET') {
const options = {
method: 'GET',
url: 'https://random-user.p.rapidapi.com/getuser',
headers: {
'x-rapidapi-host': 'random-user.p.rapidapi.com',
'x-rapidapi-key': process.env.NEXT_PUBLIC_RAPIDAPI_KEY
}
};
axios
.request(options)
.then(function (response) {
res.status(200).json(response.data);
})
.catch(function (error) {
res.status(404).json(error);
console.error(error);
});
} else {
res.status(400);
}
}

This code makes an API call to the Random User API on the server and returns the results to the user. It executes when the user makes an API call to the user endpoint I mentioned above.

Once you are done, copy the following code in the pages/index.js file:

jsx
import {useState} from 'react';
import Image from 'next/image';
import axios from 'axios';
export default function Home({value}) {
const [userData, setUserData] = useState(value.results[0]);
const [btnText, setBtnText] = useState('Generate');
/**
*
*
* Generate more user data
*/
const generateData = async () => {
try {
setBtnText('Generating...');
const {data} = await axios.get('/api/user');
setUserData(data.results[0]);
} catch (error) {
console.log(error);
}
setBtnText('Generate');
};
return (
<div className="flex flex-col items-center relative min-h-screen">
<h2 className="font-raleway font-bold text-center text-6xl text-primary pt-20 pb-6 md:text-3xl">
Random <span className="text-secondary">User</span> Generator
App
</h2>
<h3 className="text-lightGrey text-2xl font-raleway font-bold uppercase tracking-wide mb-12 md:text-base md:px-4 md:text-center">
Instantly generate a random user data
</h3>
<div className="flex justify-center items-center w-full">
<button
className="outline-none border border-danger text-primary font-bold font-raleway ml-4 w-52 px-12 py-2 rounded-sm bg-danger text-primary transition duration-300 hover:bg-bc hover:text-primary md:ml-0 md:mt-4"
onClick={generateData}
>
{btnText}
</button>
</div>
<div className="flex justify-center mt-12 w-3/6 h-4/5 md:w-4/6 md:h-full md:mb-12">
<div className="border border-2 border-primary">
<Image
src={userData.picture.large}
width="256"
height="256"
/>
</div>
</div>
<div className="flex flex-col text-primary text-sm text-raleway mt-12 w-3/6 h-4/5 md:flex-col md:w-4/6 md:h-full md:mb-12">
<table className="bg-white w-full text-primary mb-8 md:text-sm md:mx-2">
<tbody className="text-primary font-normal">
<tr>
<th className="border border-primary text-left px-4 py-4 font-normal">
Name
</th>
<th className="border border-primary text-left px-4 py-4 font-normal">
{userData.name.first} {userData.name.last}
</th>
</tr>
<tr>
<th className="border border-primary text-left px-4 py-4 font-normal">
Gender
</th>
<th className="border border-primary text-left px-4 py-4 font-normal">
{userData.gender}
</th>
</tr>
<tr>
<th className="border border-primary text-left px-4 py-4 font-normal">
Date of Birth
</th>
<th className="border border-primary text-left px-4 py-4 font-normal">
{userData.dob.date}
</th>
</tr>
<tr>
<th className="border border-primary text-left px-4 py-4 font-normal">
Age
</th>
<th className="border border-primary text-left px-4 py-4 font-normal">
{userData.dob.age}
</th>
</tr>
<tr>
<th className="border border-primary text-left px-4 py-4 font-normal">
Street
</th>
<th className="border border-primary text-left px-4 py-4 font-normal">
{`${userData.location.street.number} ${userData.location.street.name}`}
</th>
</tr>
<tr>
<th className="border border-primary text-left px-4 py-4 font-normal">
City
</th>
<th className="border border-primary text-left px-4 py-4 font-normal">
{userData.location.city}
</th>
</tr>
<tr>
<th className="border border-primary text-left px-4 py-4 font-normal">
State
</th>
<th className="border border-primary text-left px-4 py-4 font-normal">
{userData.location.state}
</th>
</tr>
<tr>
<th className="border border-primary text-left px-4 py-4 font-normal">
Country
</th>
<th className="border border-primary text-left px-4 py-4 font-normal">
{userData.location.country}
</th>
</tr>
<tr>
<th className="border border-primary text-left px-4 py-4 font-normal">
Nationality
</th>
<th className="border border-primary text-left px-4 py-4 font-normal">
{userData.nat}
</th>
</tr>
<tr>
<th className="border border-primary text-left px-4 py-4 font-normal">
Post code
</th>
<th className="border border-primary text-left px-4 py-4 font-normal">
{userData.location.postcode}
</th>
</tr>
<tr>
<th className="border border-primary text-left px-4 py-4 font-normal">
Email
</th>
<th className="border border-primary text-left px-4 py-4 font-normal">
{userData.email}
</th>
</tr>
<tr>
<th className="border border-primary text-left px-4 py-4 font-normal">
Phone
</th>
<th className="border border-primary text-left px-4 py-4 font-normal">
{userData.phone}
</th>
</tr>
<tr>
<th className="border border-primary text-left px-4 py-4 font-normal">
Cell
</th>
<th className="border border-primary text-left px-4 py-4 font-normal">
{userData.cell}
</th>
</tr>
<tr>
<th className="border border-primary text-left px-4 py-4 font-normal">
Username
</th>
<th className="border border-primary text-left px-4 py-4 font-normal">
{userData.login.username}
</th>
</tr>
<tr>
<th className="border border-primary text-left px-4 py-4 font-normal">
Password
</th>
<th className="border border-primary text-left px-4 py-4 font-normal">
{userData.login.password}
</th>
</tr>
<tr>
<th className="border border-primary text-left px-4 py-4 font-normal">
Image URL
</th>
<th className="border border-primary text-left px-4 py-4 font-normal">
<a href={userData.picture.large}>
{userData.picture.large}
</a>
</th>
</tr>
</tbody>
</table>
</div>
<div className="flex flex-col mt-10 justify-end h-36">
<p className="block mb-10 text-center text-secondary text-xs">
Made by RapidAPI DevRel Team -{' '}
<a
className="hover:text-lightGrey"
href="https://github.com/RapidAPI/DevRel-Examples-External"
>
See more examples like this
</a>
</p>
</div>
</div>
);
}
export async function getServerSideProps() {
const res = await axios.get('http://localhost:3000/api/user');
const {data: value} = res;
if (!value) {
return {
notFound: true
};
}
return {
props: {
value
}
};
}

I am using the Next.js getServerSideProps function to fetch the data from the server. It will make my application server-side, and the user will never see a loading state. You can also use getStaticProps instead of getServerSideProps, and the application will then fetch the data at build time.

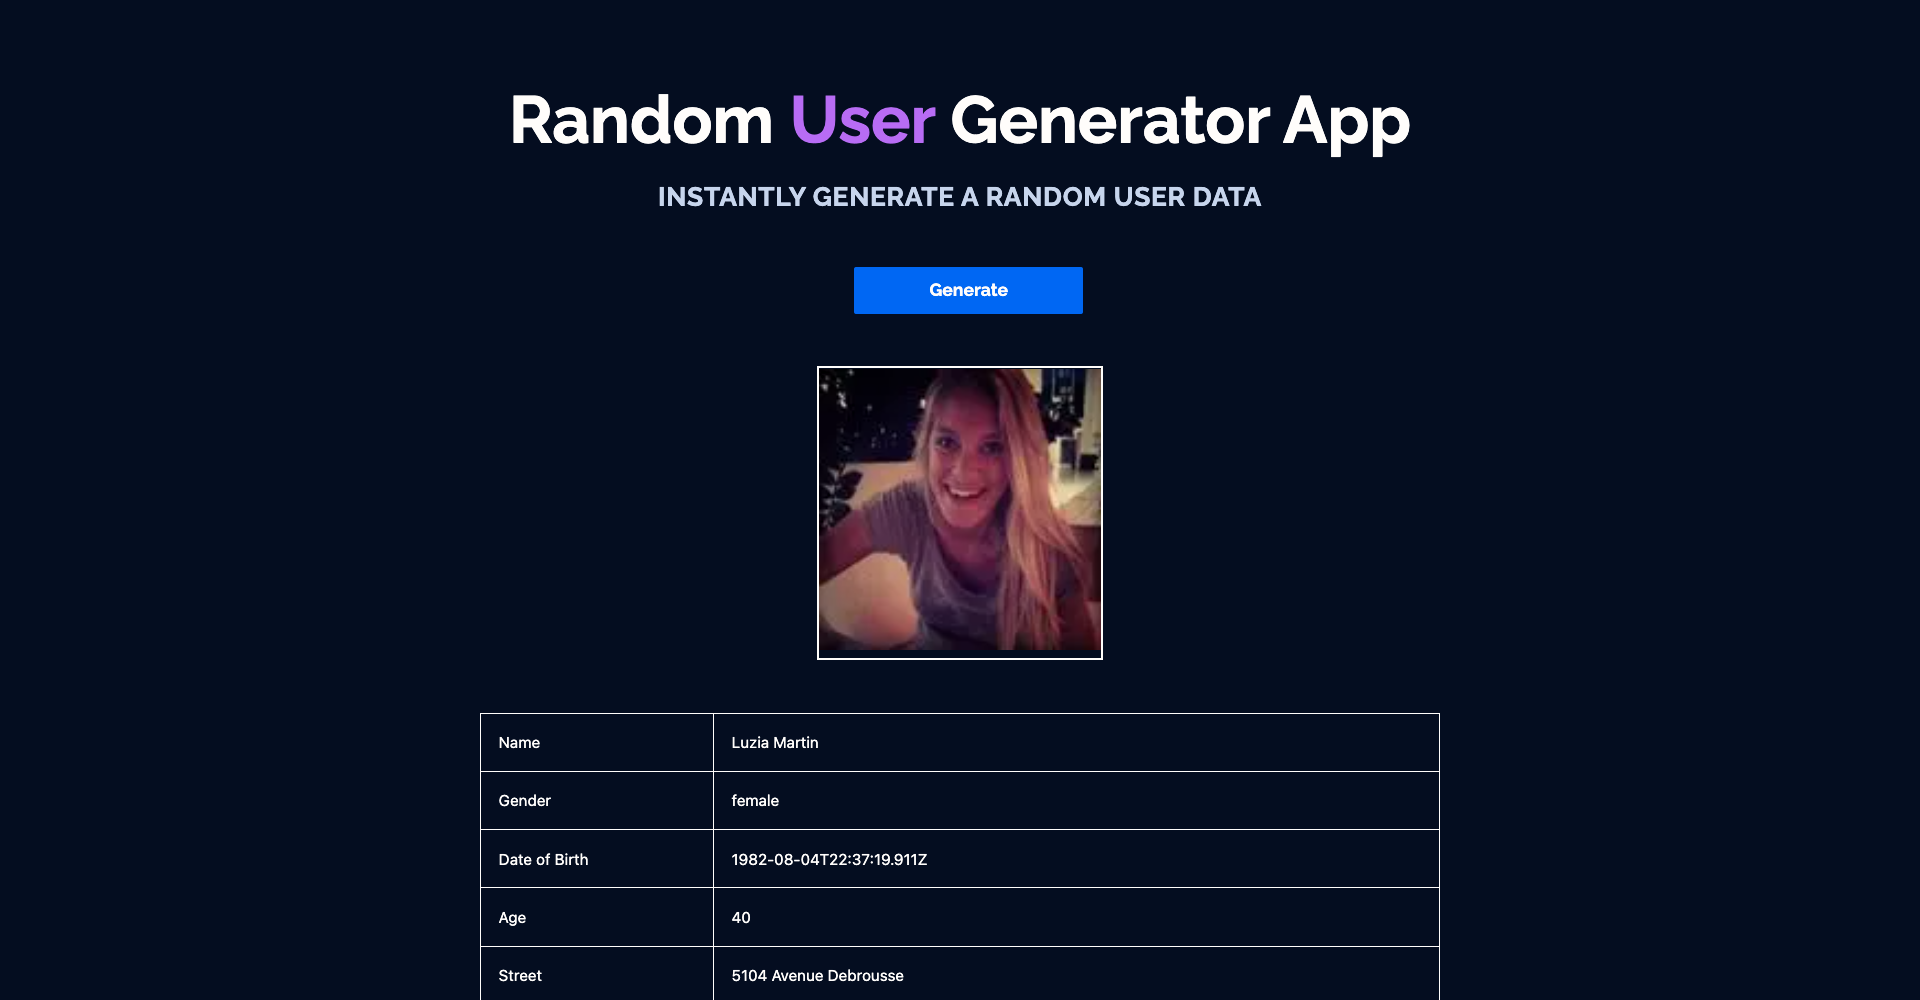
After that, I created a table to render the fake user data on the screen. I am also using the Next.js Image component to render the user image.

Wrap Up

That’s it. We have successfully built a Random User Generator App using Random User API. You can find the source code here of this web app.

In the end, it will look something like this: