Introduction
Are you involved in the development of an application that uses APIs to access and control the flow of data? Do you run your integration tests manually? Do you run integration tests? You do have formal tests, right? This tutorial will introduce you to API testing with RapidAPI’s new Testing suite of tools.
You will learn to:
- create an API specification file,
- upload it to the cloud to create an API,
- create a test for this new API, and
- run the test to see the results.
What is API Testing?
API testing is a type of software testing that involves testing application programming interfaces (APIs) directly and as part of integration testing to determine if they meet expectations for functionality, reliability, performance, and security —Wikipedia
What is an API?
API is an acronym that stands for Application Programming Interface. That means it is an interface for programming applications. You can think of an API as a set of commands, usually URLs, that we can request to get what we want.
When we’re talking about web APIs we’re usually talking about a Representational State Transfer API or “RESTful” API or just REST API for short. According to Roy Fielding, a REST API is a cacheable, stateless, uniform, client-server interface layered in a way that one piece does not know or even care about what another piece is doing.
A REST API endpoint contains two main components:
- URL – e.g.
https://rapidapi.com/testing/api - HTTP method – e.g.
GET
Accessing an API is kind of like accessing a webpage except the API responds back with just the data we requested: no images, no style-sheets, no script; just the data. Sometimes we may get back nothing, for example when we want to send an e-mail.
Where is an API?
APIs are the connecting tissue between the presentation layer and the data layer of an application:
- Presentation layer (UI),
- Service layer (API),
- Data layer (database).
The API layer contains the business logic of an application – the rules of how users can interact with services, data, or functions of the app. Because the API or service layer directly touches both the data layer and the presentation layer, it presents the sweet spot of continuous testing for QA and Development teams… While there are many aspects of API testing, it generally consists of [making] requests to… API endpoints and [validating] the response…–smartbear.com

Swagger File
A Swagger file is a text file representation of a particular API formatted using the OpenAPI Specification. We are going to use the Swagger file to Create our API.
Note: Technically, you don’t need a Swagger file to create an API since you can just do it with the user interface; or optionally with Postman or GraphQL.
Specification
Swagger donated their API specification to the Linux Foundation under the OpenAPI Initiative in 2015 at version 2.0. That’s why version two (2) is called the Swagger specification and the newer version three (currently at 3.0.3) is the official OpenAPI specification.
Release dates [wiki]
| Version | Date | Notes |
|---|---|---|
| 3.0.3 | 2020-02-20 | Patch release of the OpenAPI Specification 3.0.3 |
| 3.0.0 | 2017-07-26 | Release of the OpenAPI Specification 3.0.0 |
| 2.0 | 2014-09-08 | Release of Swagger 2.0 |
| 1.0 | 2011-08-10 | First release of the Swagger Specification |
Step 1. Create Swagger File
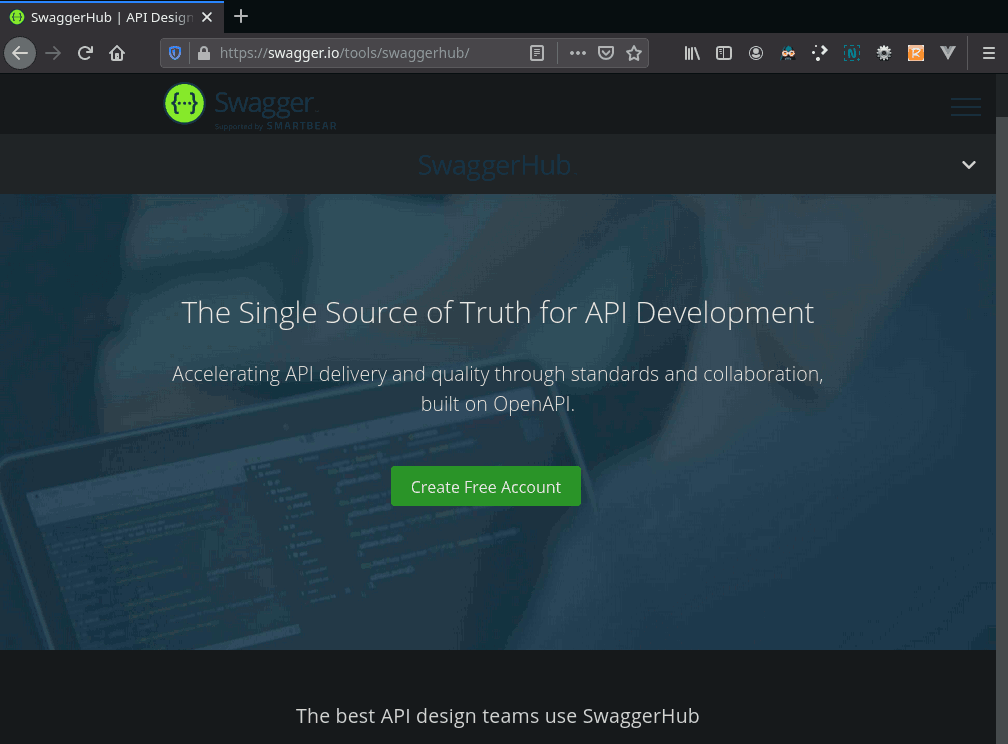
Head over to SwaggerHub and create an account (or just login if you already have an account).
Note: If you don’t want to create a SwaggerHub account you can just skip ahead in this tutorial and copy the file below.
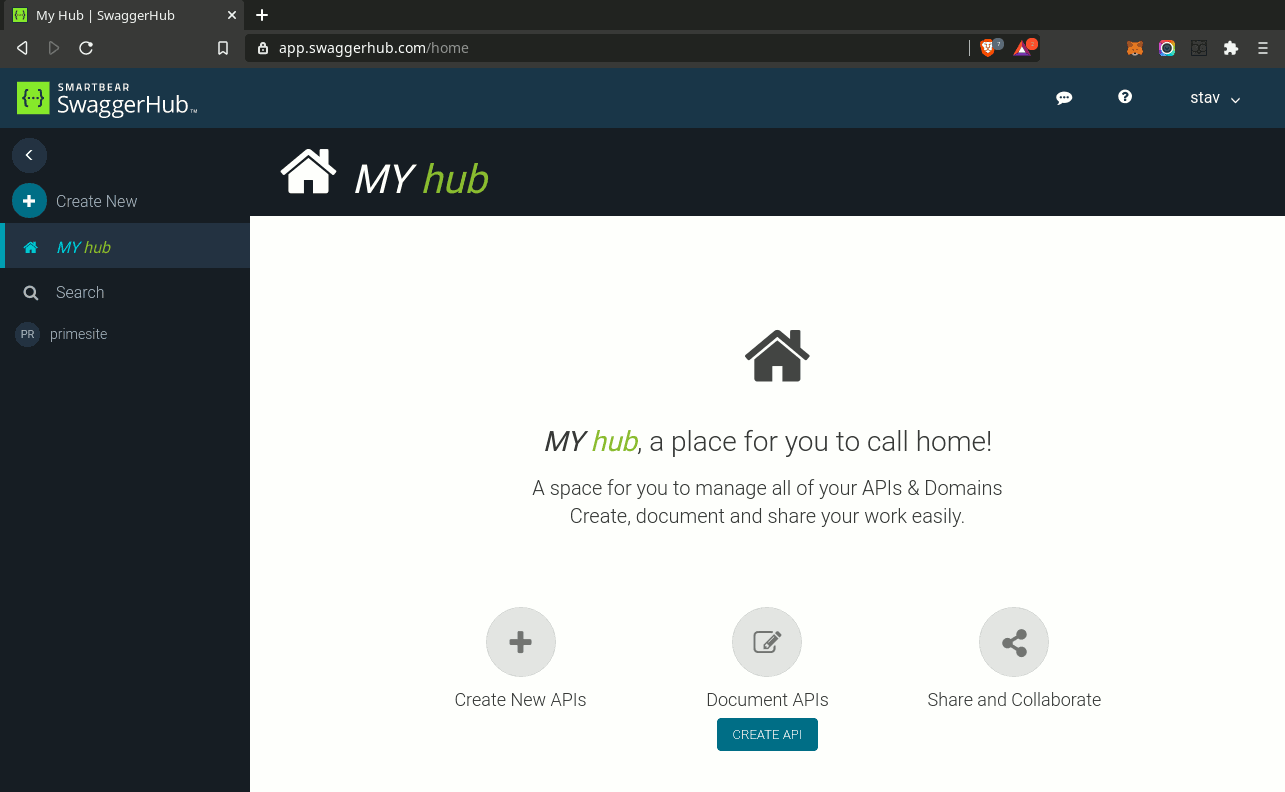
Once you log in you should be directed to the home page / MY hub:
1.1 Create New API Specification
Click on + Create New (the “CREATE API” button does the same thing).
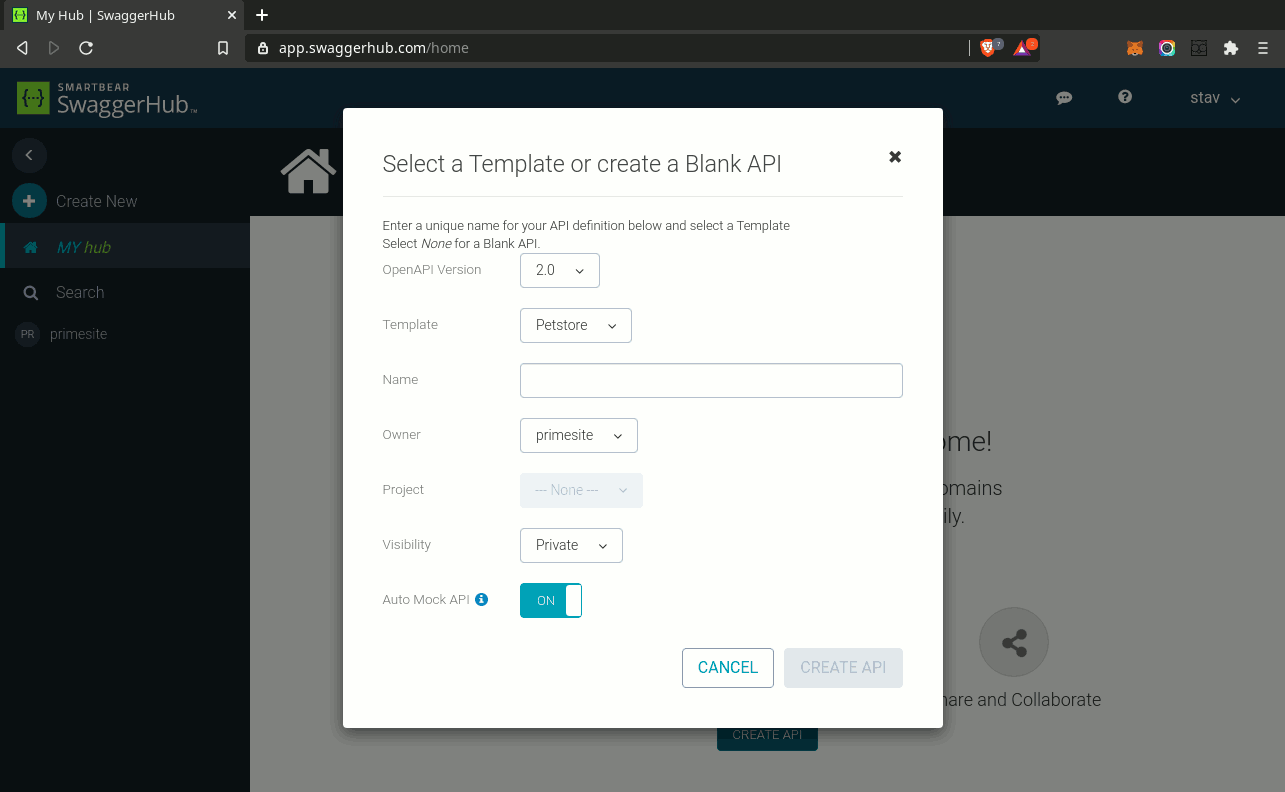
1.2 Submit Form
We will use the older OpenAPI Verison 2.0 specification as it is still more widely used than the newer spec. Set the Template to Petstore, fill-in the Name (“Petstore” might be a good name) and press the CREATE API button.
Once you create the API you will see in the code editor portion the spec which begins with swagger: '2.0'. The file will be in your default format, YAML.
1.3 Save File
Let’s export the file to our hard-drive so we can upload it to RapidAPI later when we go to create our new API.
In the upper right corner select:
- Export
- Download API
- JSON Unresolved

Here’s a snippet of what my file looks like:
{
  "swagger" : "2.0",
  "info" : {
    "description" : "This is a sample Petstore server.  You can find \nout more about Swagger at \n[http://swagger.io](http://swagger.io) or on \n[irc.freenode.net, #swagger](http://swagger.io/irc/).\n",
    "version" : "1.0.0",
    "title" : "Swagger Petstore",
    "termsOfService" : "http://swagger.io/terms/",
    "contact" : {
      "email" : "apiteam@swagger.io"
    },
    "license" : {
      "name" : "Apache 2.0",
      "url" : "http://www.apache.org/licenses/LICENSE-2.0.html"
    }
  },
  ...
The file, which is actually much longer, is on Swagger.IO.
Rapid API Testing
There are two main areas we are going to explore within the RapidAPI ecosystem:
- The Provider Dashboard – where we maintain our APIs
- The New Testing Suite – where we run our API tests
Note: Like most API services on the Internet we are required to obtain an API Key. We supply this key to the provider’s endpoints with every request. This is used to track us to make sure we are abiding by their Terms Of Service. Basically they want to make sure we’re not spamming them too quickly.
We will need to have a RapidAPI account to obtain an API key.
What is RapidAPI Testing?
RapidAPI Testing is a modern, cloud-based service that ensures the functionality, reliability, and performance of your application by testing your APIs and microservices
How Much Does It Cost?
The Basic Plan for RapidAPI Testing is completely free. Paid plans start at $59.00 a month.
See also: Testing FAQ for more details.
Step 2. Login to RapidAPI
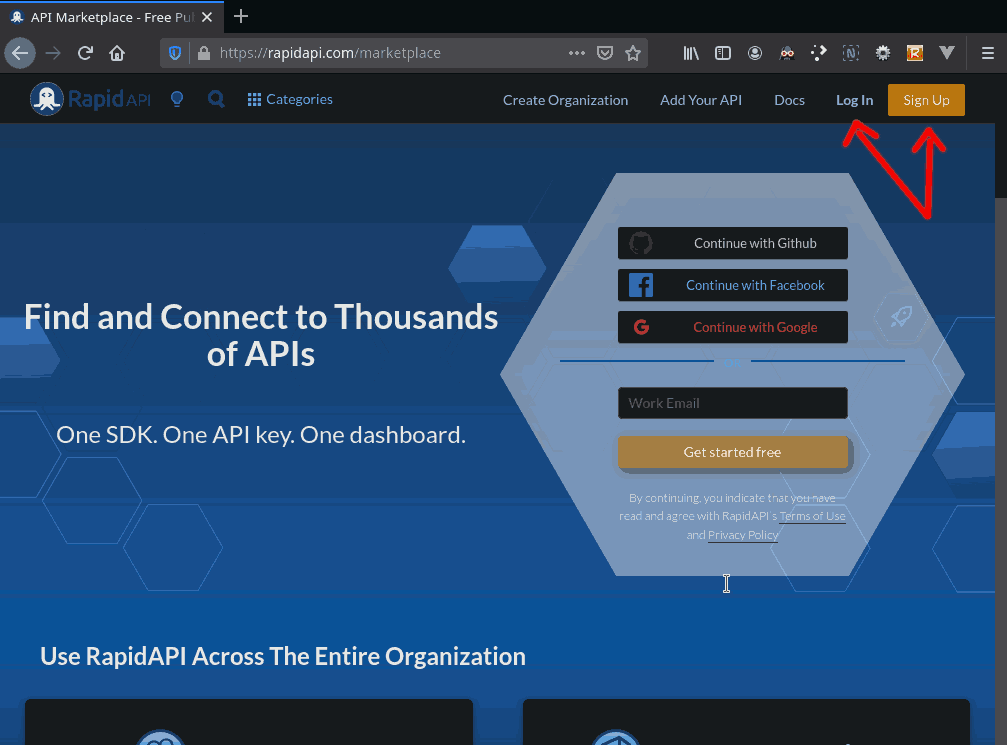
We’re going to be using RapidAPI’s new testing suite so you will need to login to RapidAPI.
Note: If you don’t already have a RapidAPI account then you will need to signup.
Create an API
Now that we are logged into RapidAPI, head over to your Provider Dashboard.
See also: Provider Dashboard documentation
Step 3. Add New API (From Provider)
Note: To get information on the basics of adding an API, as well as more advanced topics, be sure to check out the Getting Started guide in the documentation.
Click on + Add New API or head directly to Add New API.
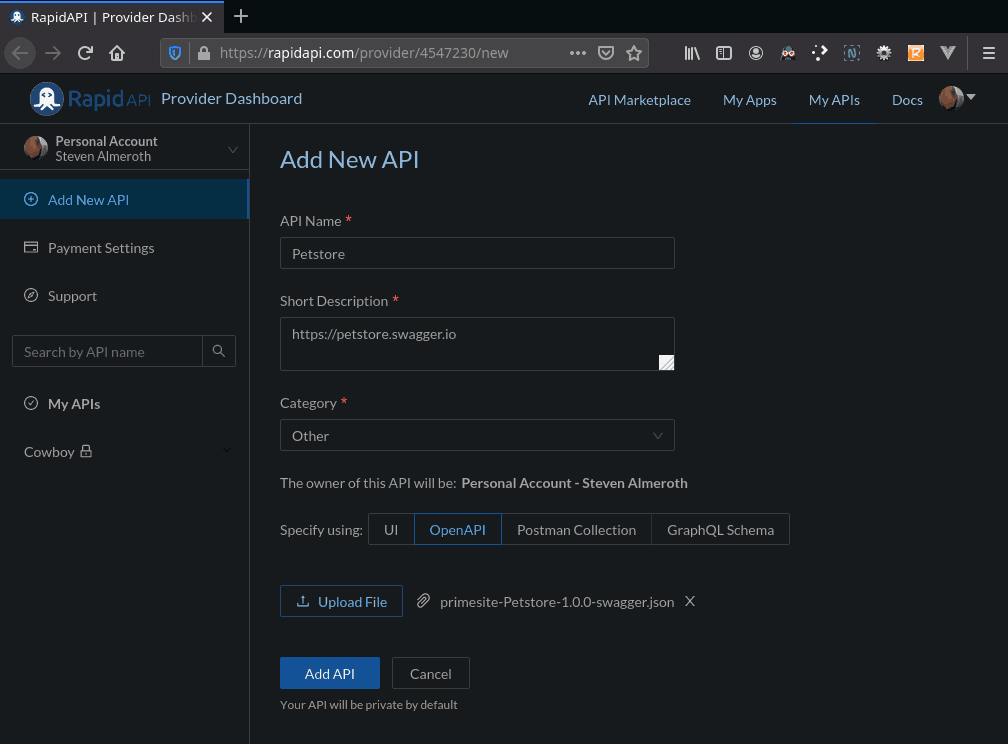
- Fill in the API Name, Short Description and Category
- Specify using: OpenAPI by clicking on the
OpenAPIbutton - Upload your spec by clicking on the
Upload Filebutton - Select the file we exported in Step 1.3 Save File
- Click on the
Add APIbutton to add the API
3.1 View Endpoints
Let’s view our API a little before we head over to the testing part of the tutorial.
See also: Endpoints documentation
Click on Definition under your Petstore API in the left side-bar then the Endpoints tab:
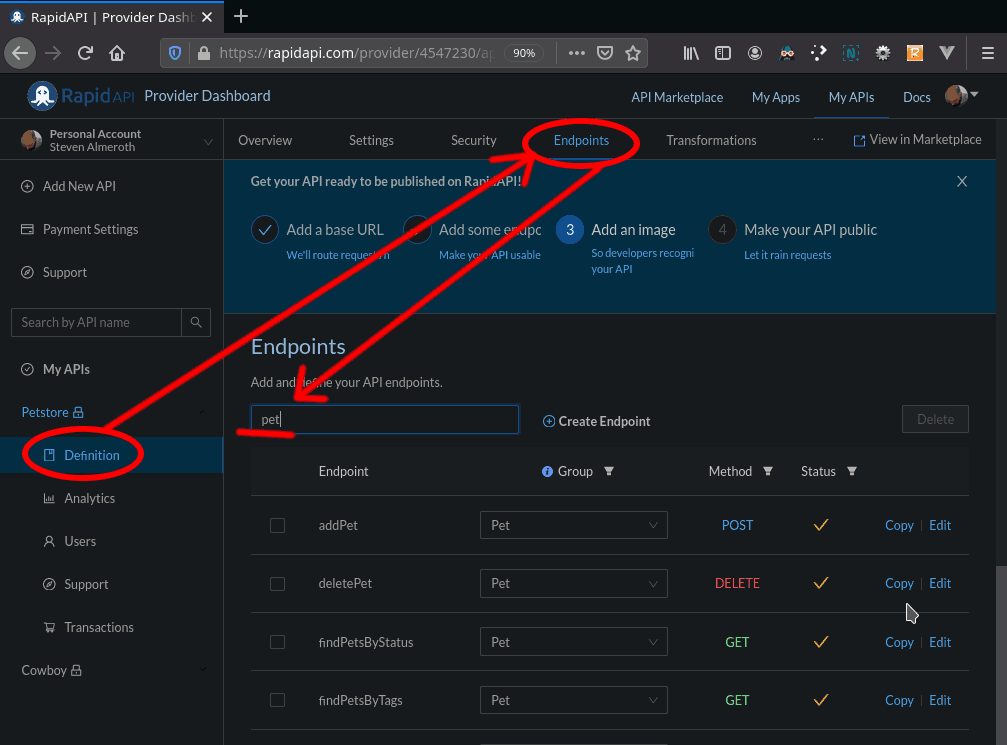
In the search box type in the word pet to just view the endpoints in the Pet Group. You should see these endpoints:
addPetdeletePetfindPetsByStatusfindPetsByTagsgetPetByIdupdatePetupdatePetWithForm
API Testing Dashboard
We just added a new API using the RapidAPI Provider Dashboard. We will now view it on the RapidAPI Testing Dashboard.
Direct your browser to the RapidAPI Testing Dashboard:
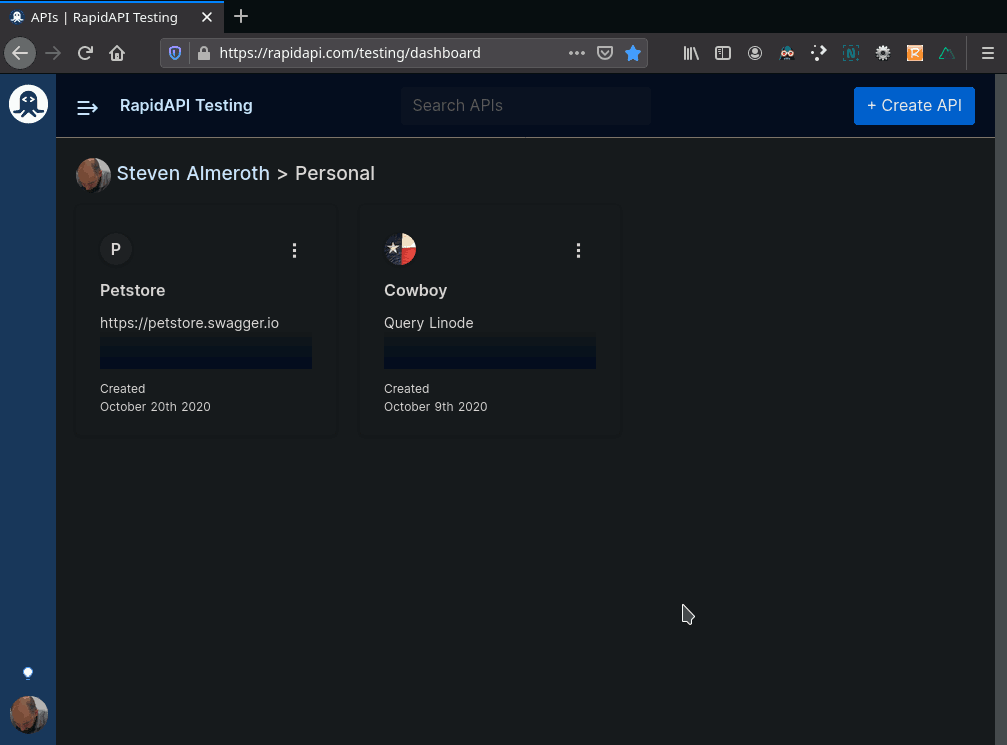
The testing suite is fully integrated with the provider side and you should see the Petstore API you just created.
Note: If you already have some APIs they will also appear here; for example, I also have an API called “Cowboy” that I created on October 9th.
In the previous step we added an API using the Provider Dashboard. It is also possible to add a new API directly from the Testing Dashboard. Let’s do that now.
Step 4. Add New API (From Testing)
Click the blue + Create API button in the upper right corner.
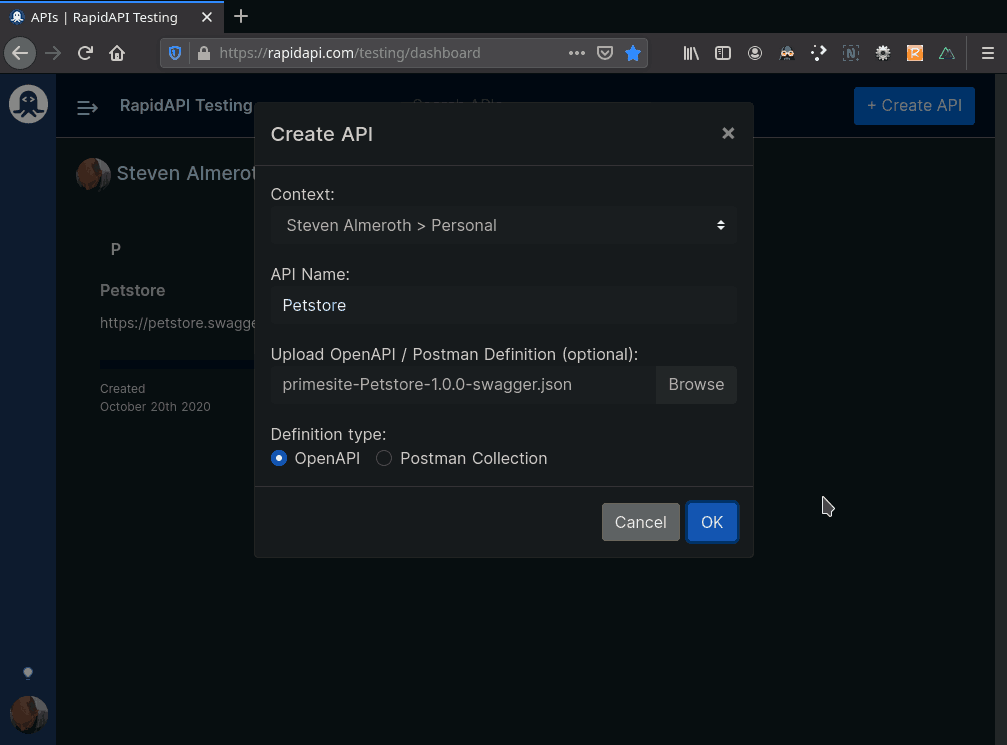
- Fill in the API Name
- Click the
Browsebutton to select the file we exported in Step 1.3 Save File - Make sure the
OpenAPIDefinition type is selected - Click on the
OKbutton to add the API
Now we should see both Petstore APIs we created:
- the first one we created from the Provider side,
- the second we just created now from the Testing side.

Step 5. Remove One API
We don’t need both Petstore APIs so let’s remove one of them.
Note: We added the duplicate API as an exercise to showcase the interoperability between the Provider side and the Testing side.
Click the vertical ellipsis on one of the Petstore APIs we added to expose the menu. Click the API Specs link which will take us back to the Provider side to do the delete:

Click on Definition under the Petstore API in the left side-bar then the Settings tab:

Scroll down to the bottom of the page to the DANGER ZONE and click the Delete This API button:
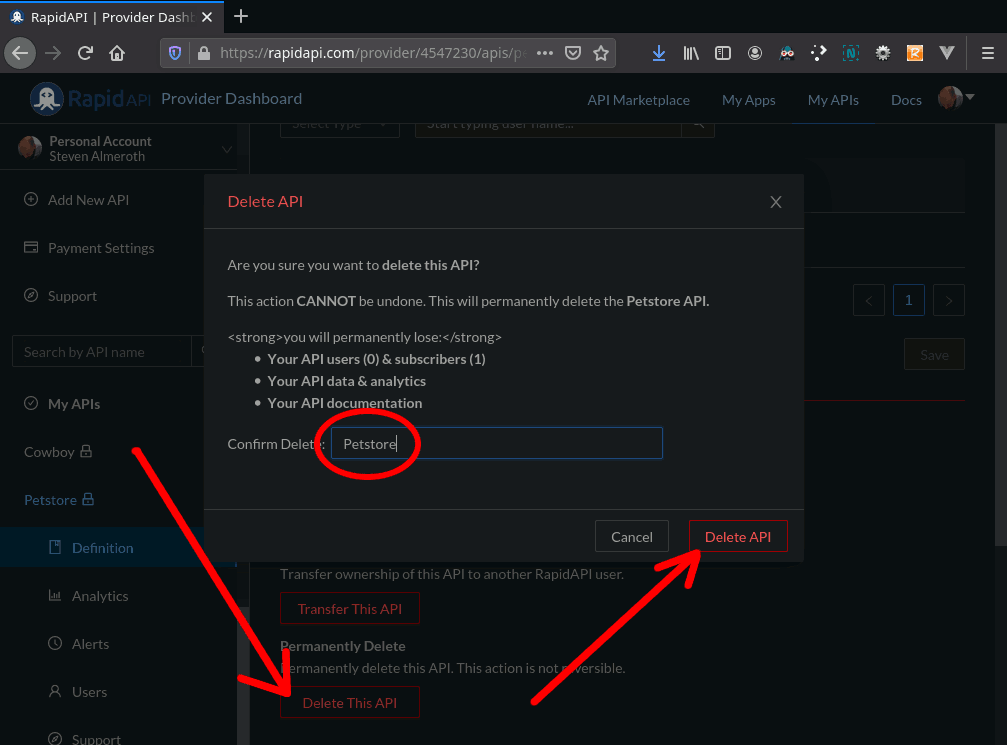
- enter the name of the Petstore as a confirmation that you’re sure
- press the
Delete APIbutton to permanently remove the API
The API should now have been deleted.
Test the API
Head back over to the RapidAPI Testing Dashboard and we should see that we only have one Petstore API now.
Click on the Petstore API box to start adding some tests:

You should now be looking at an empty list of tests for our Petstore API.
Step 6. Create Test
An API can have multiple tests, each test can have multiple steps and each step can have multiple assertions.
Take the following 3-test hierarchy as an example:
Petstore API
- Pets test
- Add pet step
- Status is 200 assertion
- Body contains Id assertion
- Get pet step
- Status is 200 assertion
- Delete pet step
- Status is 200 assertion
- Get pet step
- Status is 404 assertion
- Add pet step
- User test
- Add new users step
- Store test
- Create new order step
Now let’s create our first test.
Click on the big dashed button that says + Create Test:

- enter a name for the test in the input box
- click
OKto add the test
Step 7. Create API Call
Now let’s create our first test. We’ll use the Request Generator to help us.
Click on the blue bar at the bottom of the screen:
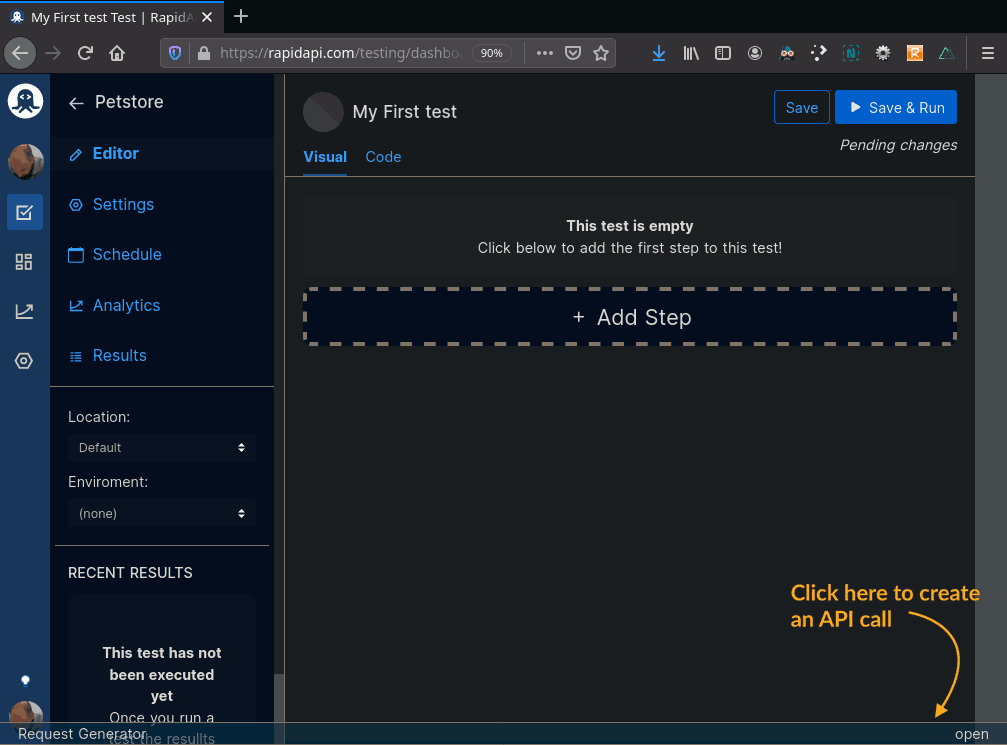
See also: Automatic Test Generation
7.1 Load findPetsByStatus Endpoint
Once you have the Request Generator open you will see the three endpoint groups: pet, store & user and all the endpoints underneath each. For example you’ll see all the pet endpoints we looked at above in section 3.1 View Endpoints.
Under the pet group click on GET findPetsByStatus endpoint in the left column. This will automatically load four things for us into the middle column:
- the Method:
GET - the URL:
https://petstore66.p.rapidapi.com/pet/findByStatus(yours may be different) - the URL Parameters:
{status: ["available"]} - the Headers:
{X-RapidAPI-Key: "804..."}
7.2 Send the Request
All we need to do is click the blue Send button to make the call to the API.
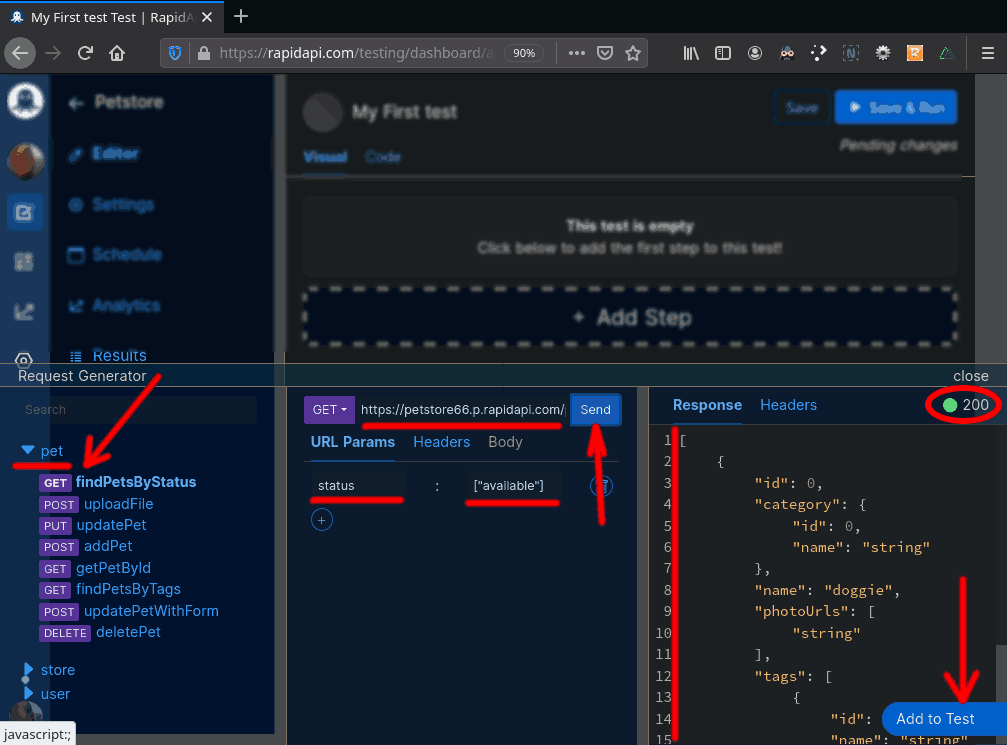
We should get back the response in the right column – a JSON text body with fields like: id, category, name, etc; as well as the 200 status code letting us know the request was received and processed without errors.
7.3 Add Step
At this point everything looks good so we can click on the button to Add to Test.
Before the step gets added to the test we will be prompted with a dialog popup that allows us to declare any Assertions that we want to define. For example we want to assert that the response content was in the proper format and that we did not get an error status code:
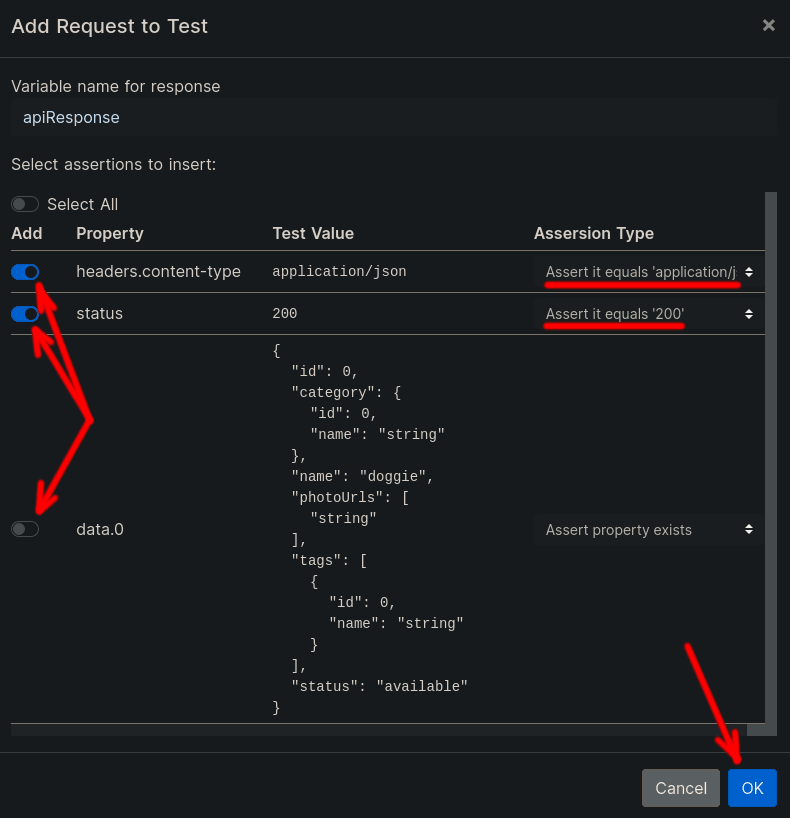
In the Add Request to Test popup we will be allowed to declare assertions defaulted with fields and their values from the response that we received. In our case we can add assertions for three fields:
headers.content-typestatusdata.0
See also: Making Assertions
We only want to add assertions for the first two so disable the last one but keep the first two enabled. Also under Assertion Type use the drop-downs to select the equals assertions. Specifically:
headers.content-typeequals'application/json'statusequals200
Then press the OK button to add the request step to our first test.
Step 8. Run Test
When we are returned to the test details screen we should see all three (3) components to our test:
- the HTTP GET request to our API endpoint,
- the content-type equals assertion, and
- the status equals assertion.
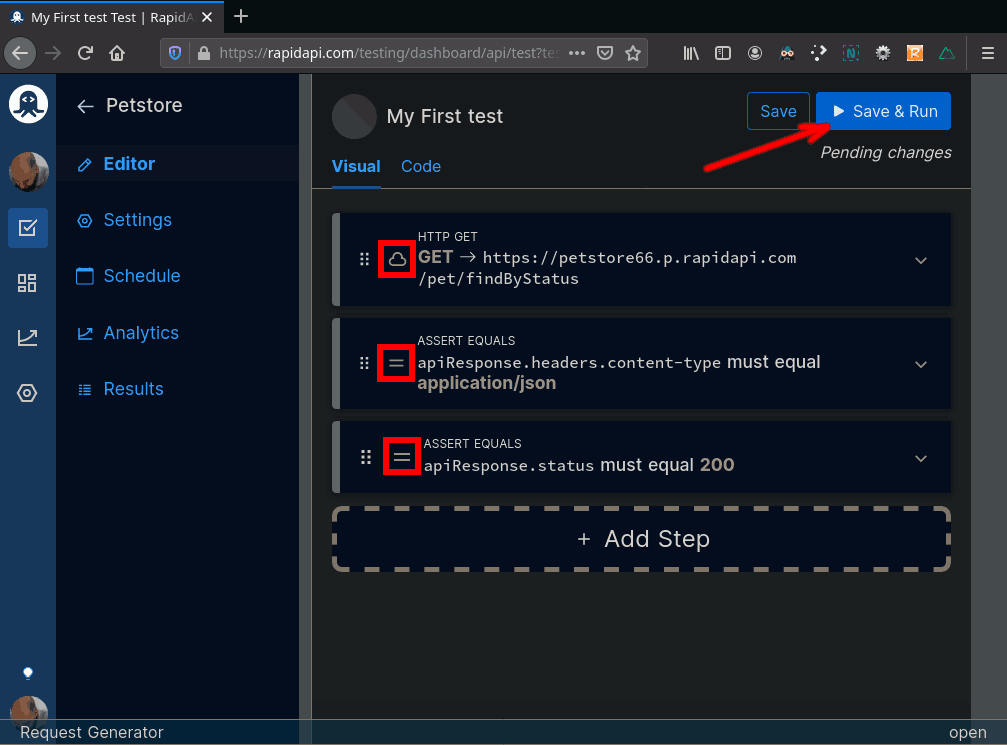
See also: Visual Editor (Drag-and-Drop)
8.1 Save & Run
Now we’re ready to run the test so hit the Save & Run button.
Note: RapidAPI does not magically spin up a Petstore server with code that it reverse-engineers from your API spec. So when we run tests the responses we get back are “mocked” which means the input we give doesn’t really matter. The responses are hard-coded and will be the same every time. Mocking is a useful way to start developing tests even before we have any API code written.
If everything went well then you should see a green circle up top next to the name meaning all steps were successful:

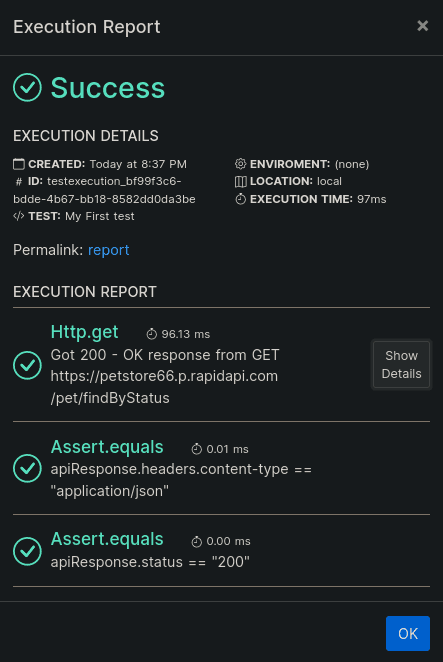
8.2 Execution Report
Click on the results details in the lower left corner to see the Execution Report:
Step 9. Mock Test
So where does RapidAPI get the mocked responses?
Good question. And the answer is the Swagger file.
Let’s examine the definition of the path /pet/findByStatus:
{..."/pet/findByStatus" : {
      "get" : {
        "tags" : [ "pet" ],
        "summary" : "Finds Pets by status",
        "description" : "Multiple status values can be provided with comma separated strings",
        "operationId" : "findPetsByStatus",
        "produces" : [ "application/json", "application/xml" ],
        "parameters" : [ {
          "name" : "status",
          "in" : "query",
          "description" : "Status values that need to be considered for filter",
          "required" : true,
          "type" : "array",
          "items" : {
            "type" : "string",
            "enum" : [ "available", "pending", "sold" ],
            "default" : "available"
          },
          "collectionFormat" : "multi"
        } ],
        "responses" : {
          "200" : {
            "description" : "successful operation",
            "schema" : {
              "type" : "array",
              "items" : {
                "$ref" : "#/definitions/Pet"
              }
            }
          },
          "400" : {
            "description" : "Invalid status value"
          }
        },
        "security" : [ {
          "petstore_auth" : [ "write:pets", "read:pets" ]
        } ]
      }
    },...}
For this path line 92 beings the specification for the get endpoint which ends on line 128. The definition of the input parameter status (not to be confused with the response status) begins on line 99 and ends on line 110. It is a required input which we see on line 102. The default value of "available" is defined on line 107.
The responses are defined starting on line 111. We have two (2) potential responses defined: status 200 and status 400.
See also: Mock Responses in the documentation which details how to customize the mock responses.
Wrapping Up
I hope you enjoyed this tutorial and perhaps learned something about API testing. If you have any questions be sure to leave them in the comments below.
Series
This article is the first in a series about API Testing. We will continue with the second part: API Testing Automation.
FAQ
Frequently Asked Questions
What steps are involved in an API test?
- Setup: Create objects, start services, initialize data etc
- Execution: Steps to exercise API or scenario, also logging
- Verification: Oracles to evaluate execution outcome
- Reporting: Pass, failed or blocked
- Clean up: Pre-test state
What types of tests can API testing perform?
There are many types of API test. Some of them are: Compliance, Functional, Fuzz, Interoperability, Load, Penetration, Runtime/ Error Detection, Security, UI testing and Validation testing.

Leave a Reply