How to build a REST API using Node.js and Express.js in 6 minutes?
When developing an application, you often need to create REST APIs to communicate with the server. The question is, why do you need a server? While there are many reasons, one is you perform all the database operations on the backend, so the sensitive data is not exposed to the browser.
Since you need to either retrieve, delete, create or update existing data, you need a communication channel to move the data around. And that channel is the REST API. If you want to read more about REST APIs, check out this article.
Before we dive into how you can make a REST API, let’s first take a look at Node.js and Expres.js.
Node.js And Express.js
Before Node.js, you could only run JavaScript inside a web browser. It is a JavaScript runtime built on top of Chrome’s V8 engine. In layman terms, you can now run JavaScript in your terminal.
Express.js is a backend Node.js framework used to set up a Node.js based server. It is minimal and flexible and provides a robust set of features for web and mobile applications. You can create routes, middlewares, and everything you need in a server using it.
Build A REST API
Let’s go ahead and start building a REST API using Node.js and Express.js. We will do it in steps to make it easier to follow.
→ STEP #1
You can skip this step if you have already installed Node.js on your computer. If you haven’t, you can download the latest version from here. Afterward, install it on your computer and then restart it.
→ STEP #2
Now create a directory on your computer and open it in your preferred code editor. Now create a package.json file inside this directory and copy-paste the following code there:
json
You can write your name as a value to the name key.
We need to install Express.js in this project. For this, open your terminal inside this directory and run the following command:
sh
You can run your Node.js server via the node command, but the drawback is that you would have to restart the server whenever there is a change in the server files. What we can do is use nodemon instead. It will run the server without the previously mentioned drawback.
sh
I am installing nodemon as a developer dependency because your server code will not depend on it.
Once done, update your package.json file to add the script key. It will take an object as its value. Inside the object, you will define the commands and what they do. Add the server key in this object with the value nodemon index.js.
Here is an updated package.json file that you can refer to just in case:
json
→ STEP #3
Now create a file called index.js in your project directory and import express inside it.
js
Now create an express application by adding the following code in the index.js file:
js
We need to introduce a middleware so our server recognizes the incoming request objects as JSON objects. For that, add the following piece of code in index.js file:
js
Lastly, we need to listen for a connection to know that our server is running. You can do this by adding the following lines of code in your index.js file:
js
After all this, the index.js file will look something like this:
js
→ STEP #4
Create a folder called routes in the root directory and inside this folder, create a file called hello.js. Inside the file, copy-paste the following code:
js
I am importing packages at the top of the file and creating a router using the express package. Afterward, I have written four functions of router to handle the GET, POST, PUT, and DELETE requests. In each of these functions, I am passing a callback function as the second parameter to send a response to the client.
Lastly, I am exporting the router I have just created from this file.
→ STEP #5
Import this file inside the index.js file using the following code:
js
Now register this route in your application like this:
js
The functions inside the hello.js file will run when the client requests the /hello endpoint. For instance, https://api/hello.
The code in the index.js file will look like this in the end:
js
→ STEP #6
Now start the server by running the following command in the terminal:
sh
Go to this URL. You will see a response like the following:
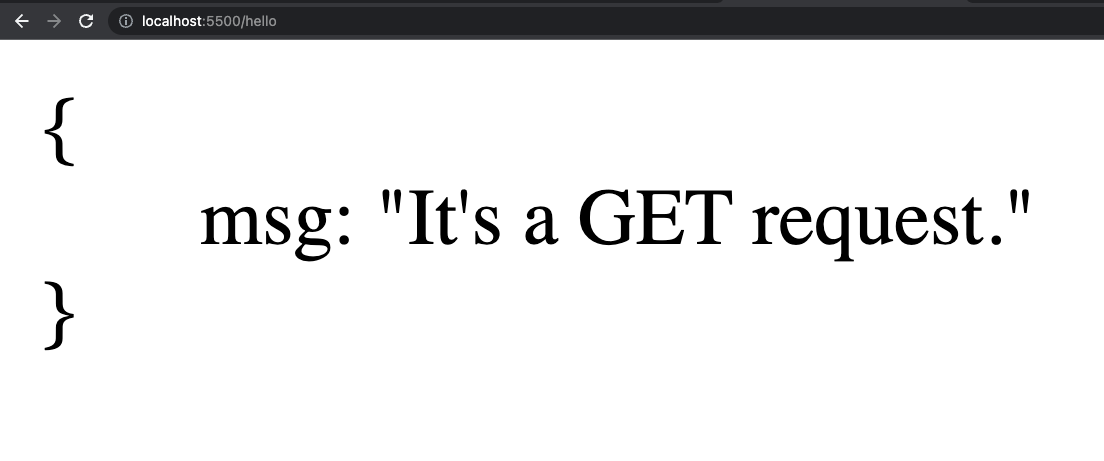
The GET request is executing because when you call an API via the browser’s address bar, it makes a GET request to the API.
Wrap Up
If you followed along until now, you would have successfully created a REST API. Since it is a server, make sure you handle CORS; otherwise, your API requests will be blocked. We have also written a piece on how you can do it. Other than this, I hope this article helped you understand how to create a simple REST API.