How to build a Sports app in Next.js using a Sports API from RapidAPI Hub?

•

Fri Nov 26 2021

•

10 min read

Today, public APIs provide a fast and convenient way to develop an application. Whether a small tool-based application or a big eCommerce portal, these APIs can be very serviceable.

RapidAPI Hub lets you choose from thousands of these public APIs for use in your projects. You can explore thousands of these on RapidAPI Hub and select one for your next project.

Today, we will be building a web application that will display football scores and other information, which we will get from the API. Let's make it.

Stack

The stack for our app is going to be as follows. I am going to use Next.js for the client-side of our app and TailwindCSS for styling it.

Even if you don’t know about Next.js, being familiar with React will be enough for this guide. Tailwind is a CSS framework that provides utility classes to use directly in the markup, saving time during the development process.

Choosing The API

We need an API that will serve us data related to sports. Let’s find an API that meets our requirements. Go to RapidAPI Hub and create an account if you haven’t already. Then, search for "Sports" in the search field.

Loading component...

You will see that we have a bunch of options for Sports APIs. I am going to build a football-related app so that I will use Football Web Pages API.

To use this API, you need to subscribe to it first. You can do this by clicking on the Subscribe to Test button.

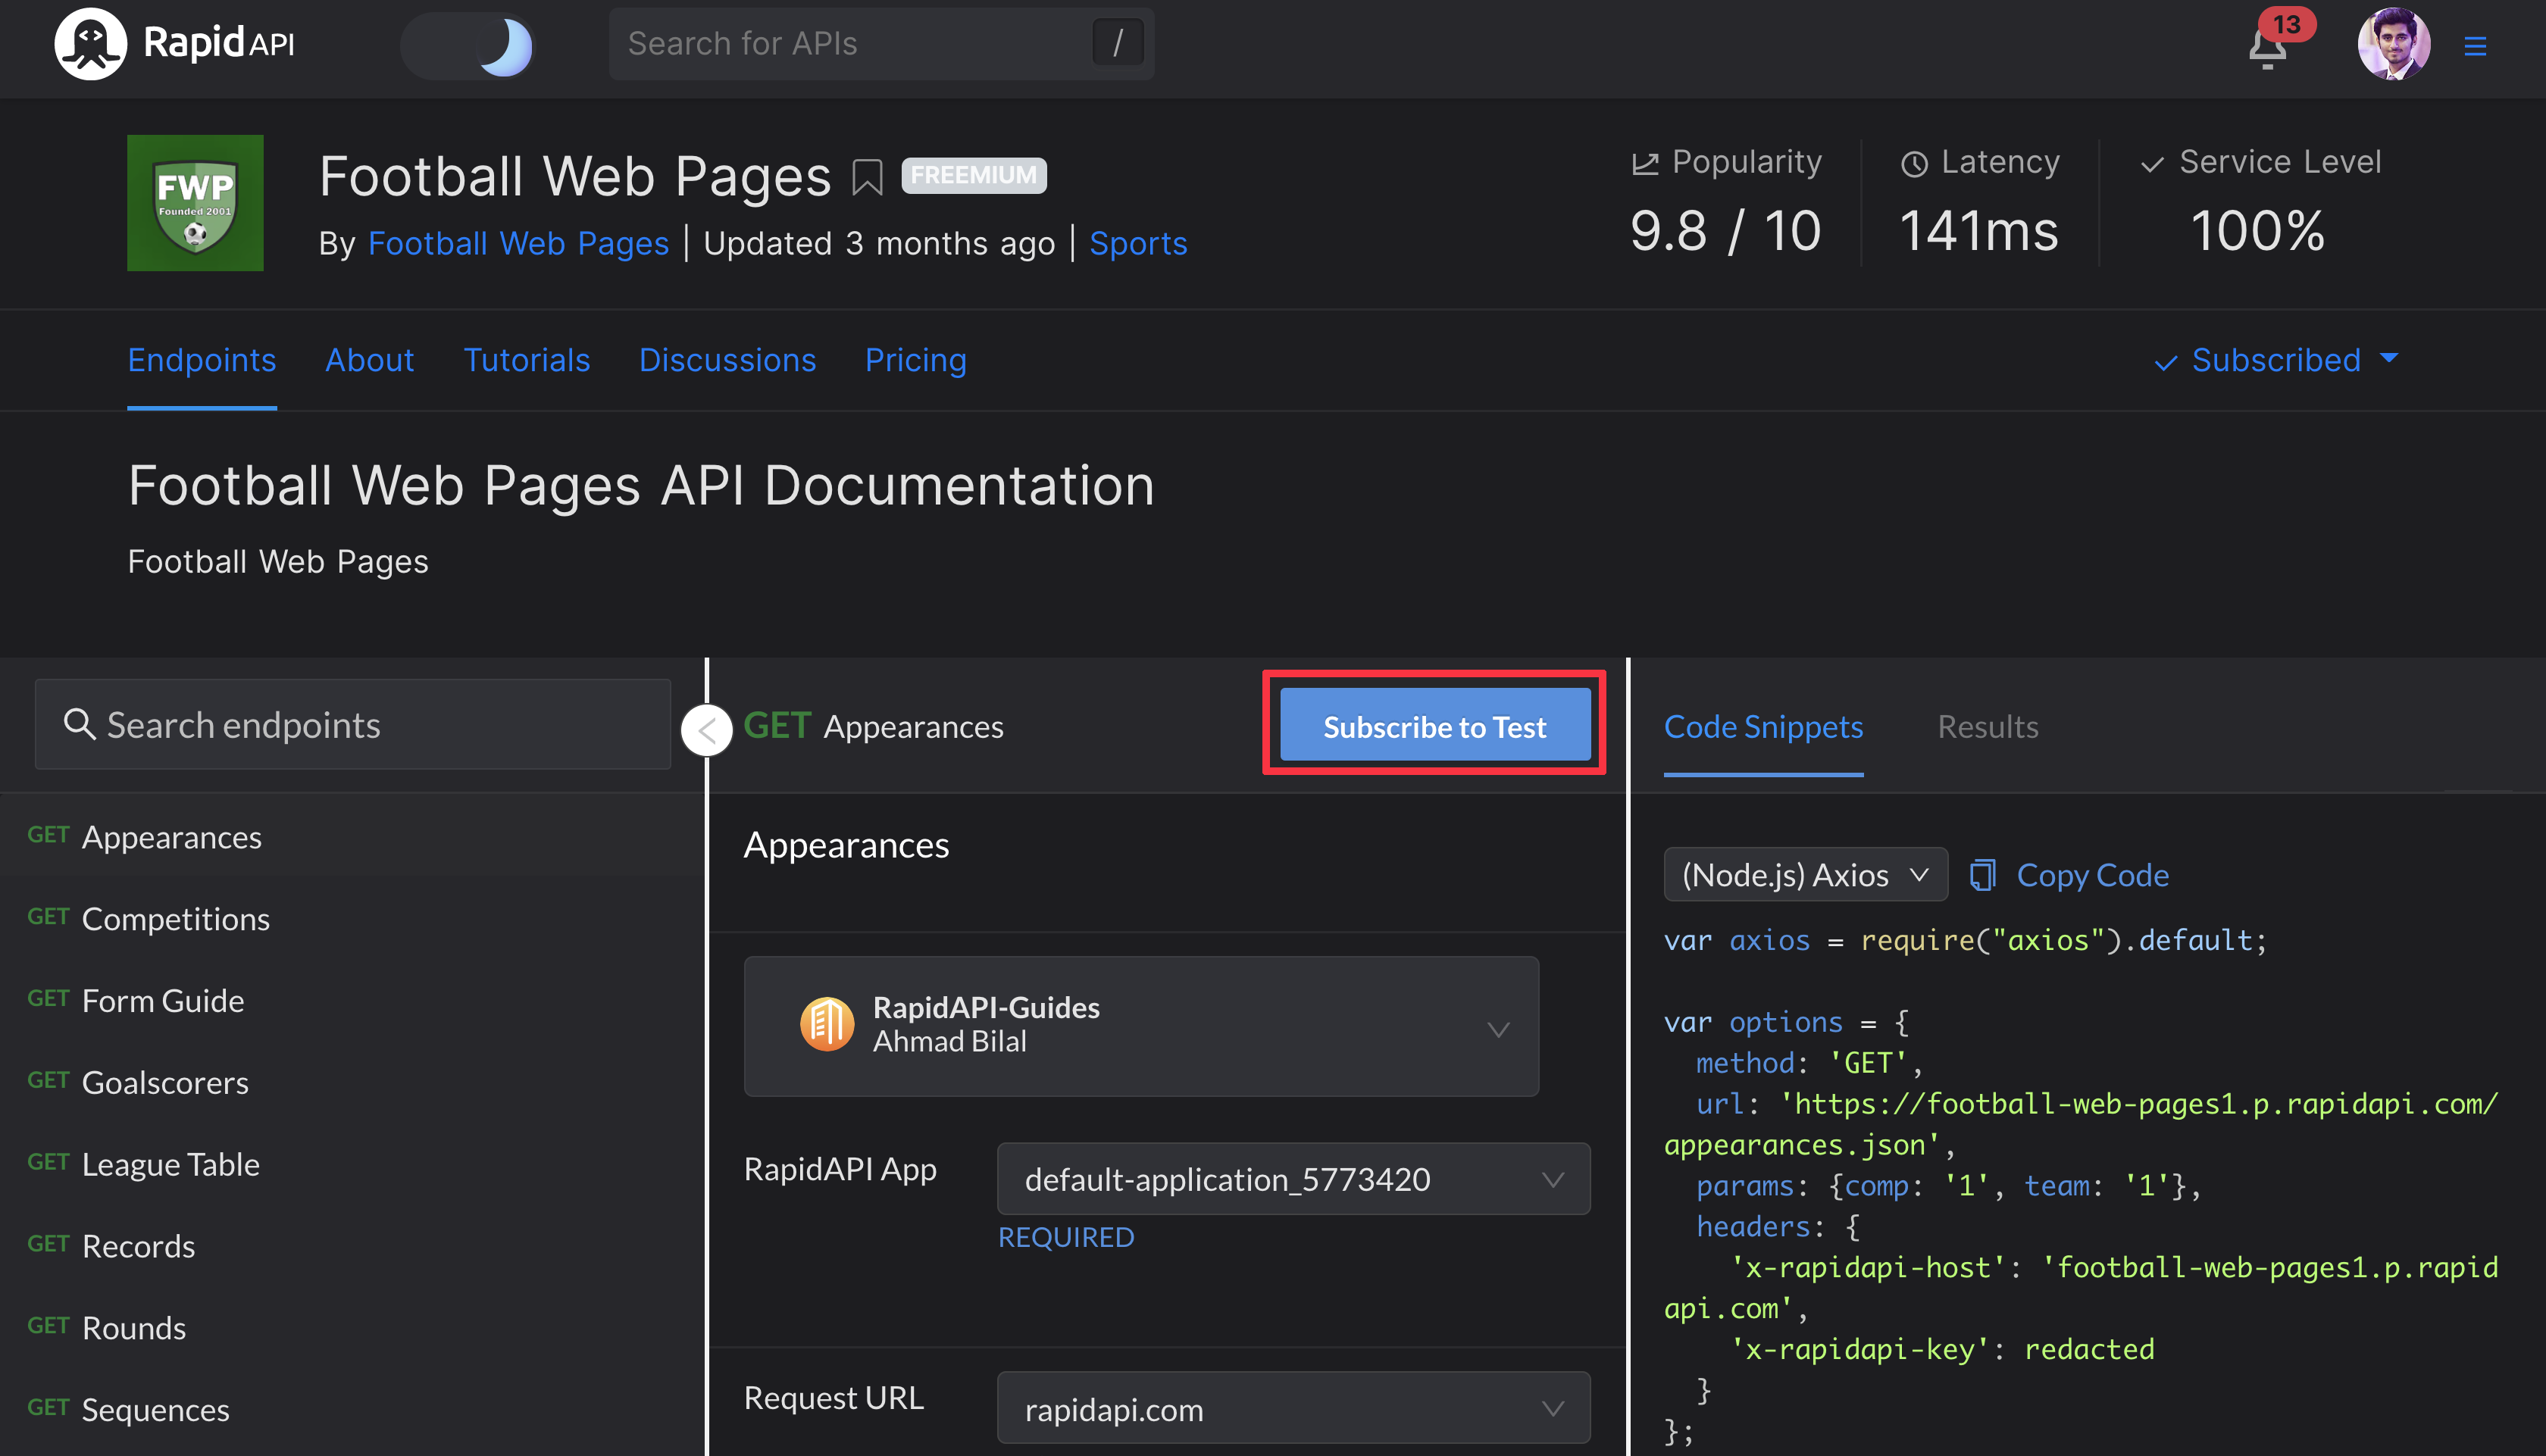
Once you click the button, you will be redirected to the pricing page, which will show the subscription packages for the API. The free plan allows up to 500 requests per day. We are going to subscribe to the free plan for this guide.

Once subscribed, you will be back on the Endpoints page. In the central section, you should see a field named x-rapidapi-key. Save its value. We will need it later to call the API.

Building The UI

We can create a Next.js boilerplate with TailwindCSS integrated by running the following command in your terminal.

sh
npx create-next-app -e with-tailwindcss sports-app

It will take some time to install the packages. After generating the boilerplate, you will see a folder with the name sports-app has been created. Open this folder in your preferred code editor.

Project Files

In our project folder, we will have the following folders and files. I will briefly break them down for you:

  • pages directory: It has the index.js file, which is the entry point of our app, basically the home page. It also has_app.js and another directory named api, where we will store the requests to our API.
  • public directory: It holds assets. You can place your static files here to load later in the application.
  • package.json: This file contains the metadata of your project.
  • package-lock.json: This file is responsible for tracking the exact version of every installed package.
  • postcss.config.js: This file contains PostCSS configurations.
  • tailwind.config.js: It contains TailwindCSS configurations.
  • readme.md: It’s a markdown file for documentation.

I will be using a particular set of colors for this app. You can use colors of your preference, but if you are interested in mine, open this file, and copy all of its content, then paste it inside the tailwind.config.js file in your project. These are Tailwind configurations for the colors I will be using.

With all that set, it's time to code the app. Let's jump right into it.

→ STEP #1

Open the pages/index.js file and remove all the existing code. Let's add the layout.

js
export default function Home() {
return (
<div className="flex flex-col bg-background font-raleway items-center min-h-screen">
<h1 className="text-6xl text-primary font-bold mt-20">
Sports <span className="text-active">App</span>
</h1>
<h2 className="text-active text-2xl mt-6">
Next.js app which provides latest Football Scores.
</h2>
</div>
);
}

→ STEP #2

Let’s integrate the API now. For this, first, create a .env.local file in the root directory of your project and paste the following into it:

sh
NEXT_PUBLIC_RAPIDAPI_KEY=YOUR-RAPIDAPI-KEY

Remember the x-rapidapi-key I asked you to save earlier? You need to replace YOUR-RAPIDAPI-KEY with its value. You get the key after subscribing to the Cryptocurrency API.

Now download and add axios to your project. For this, run the following command in the terminal:

sh
npm install axios

And import axios in pages/index.js.

js
import axios from 'axios';

→ STEP #3

The Football Web Pages API provides a lot of valuable endpoints which you can use in your app, like appearances, teams, matches, league tables, etc. You can see these endpoints on the left pane. We will demonstrate one of these endpoints, the League Table, which returns data about the current positions of teams in the given league.

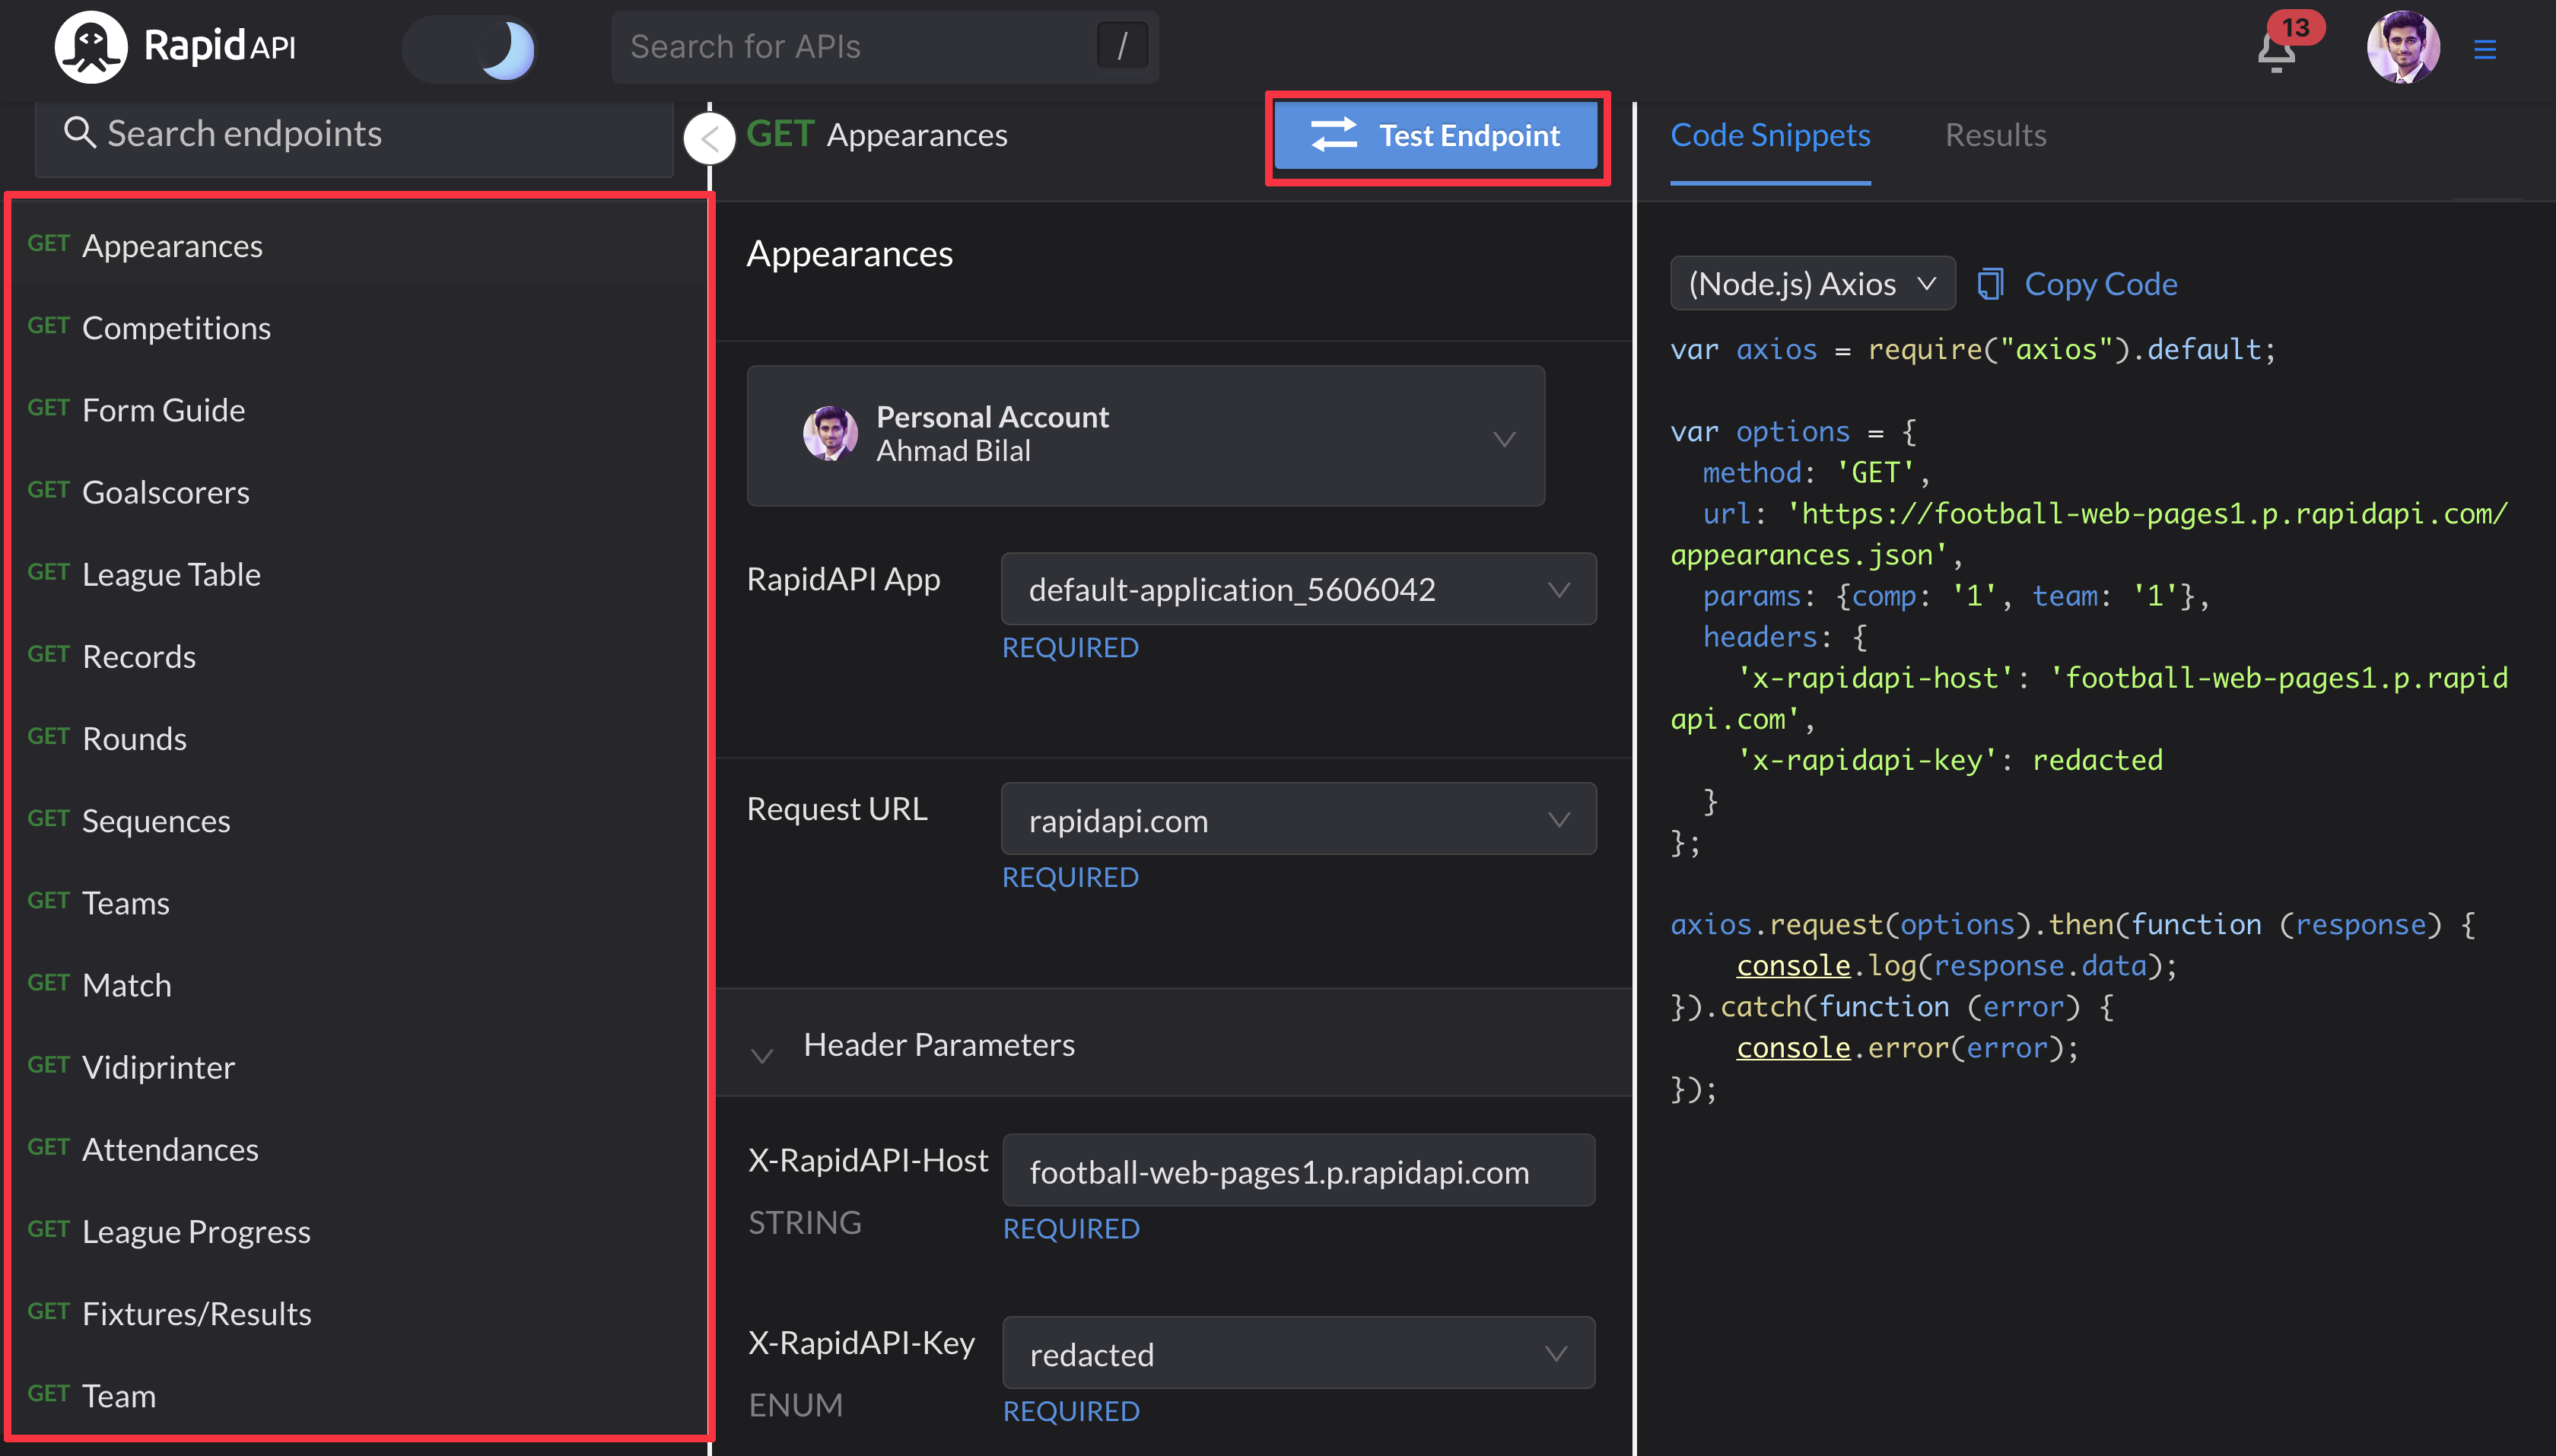
We will send a GET request to get the data. For easy integration, RapidAPI Hub automatically generates snippets in multiple languages and options. As you can see above, we will copy the (JavaScript) Axios one.

Next, I am going to create a file named league.js in the pages/api directory and use the code snippet as follows:

js
import axios from 'axios';
export default async function handler(req, res) {
const options = {
method: 'GET',
url: 'https://football-web-pages1.p.rapidapi.com/league-table.json',
params: {comp: req.query.leagueID}, // ID of the league
headers: {
'x-rapidapi-host': 'football-web-pages1.p.rapidapi.com',
'x-rapidapi-key': NEXT_PUBLIC_RAPIDAPI_KEY // Variable for API key we stored in .env.local
}
};
axios
.request(options)
.then(function (response) {
res.status(200).json(response.data);
})
.catch(function (error) {
console.error(error);
});
}

→ STEP #4

Our API call is ready. Now we need to create the UI accordingly. We are requesting a specific league by passing the leagueID parameter. So, there should be a way to select different leagues to get their score tables. I will be using buttons to toggle between three leagues. You can also use a select menu with all the leagues supported by the API.

js
export default function Home() {
return (
<div className="flex flex-col bg-background font-raleway items-center min-h-screen">
<h1 className="text-6xl text-primary font-bold mt-20">
Sports <span className="text-active">App</span>
</h1>
<h2 className="text-active text-2xl mt-6">
Next.js app which provides latest Football Scores.
</h2>
<div className="mt-10 grid grid-cols-3 gap-4">
<button class="block w-full rounded-md px-5 py-3 bg-primary text-base font-bold text-background focus:outline-none hover:bg-active sm:px-10">
Premier League
</button>
<button className="block w-full rounded-md px-5 py-3 bg-primary text-base font-bold text-background focus:outline-none hover:bg-active sm:px-10">
Bundesliga
</button>
<button className="block w-full rounded-md px-5 py-3 bg-primary text-base font-bold text-background focus:outline-none hover:bg-active sm:px-10">
Spanish La Liga
</button>
</div>
</div>
);
}

→ STEP #5

We will require two states, one for holding our league selection and one for the response we will get from the API. I will also create a function getLeague in the pages/index.js file to send the request from the client-side to our API at http://localhost:3000/api/league. Finally, we will need a useEffect hook to trigger this function whenever we select a different league.

js
import axios from 'axios';
import {useState, useEffect} from 'react';
export default function Home() {
const [league, setLeague] = useState(null);
const [leagueID, setLeagueID] = useState(null);
// Getter funciton for getting league table data.
const getLeague = async () => {
try {
const res = await axios.get('api/league/', {
params: {leagueID}
});
const {data} = res;
setLeague(data['league-table']); // Traversing the object to get the league table data.
} catch (error) {
console.error(error);
}
};
// Call the getLeague function only when user selects a different league.
useEffect(() => {
getLeague();
}, [leagueID]);
return (
<div className="flex flex-col bg-background font-raleway items-center min-h-screen">
<h1 className="text-6xl text-primary font-bold mt-20">
Sports <span className="text-active">App</span>
</h1>
<h2 className="text-active text-2xl mt-6">
Next.js app which provides latest Football Scores.
</h2>
<div className="mt-10 grid grid-cols-3 gap-4">
<button
class="block w-full rounded-md px-5 py-3 bg-primary text-base font-bold text-background focus:outline-none hover:bg-active sm:px-10"
onClick={() => {
setLeagueID('1');
}}
>
Premier League
</button>
<button
className="block w-full rounded-md px-5 py-3 bg-primary text-base font-bold text-background focus:outline-none hover:bg-active sm:px-10"
onClick={() => {
setLeagueID('92');
}}
>
Bundesliga
</button>
<button
className="block w-full rounded-md px-5 py-3 bg-primary text-base font-bold text-background focus:outline-none hover:bg-active sm:px-10"
onClick={() => {
setLeagueID('94');
}}
>
Spanish La Liga
</button>
</div>
</div>
);
}

See the getLeague function I have created to get the response from the API. We bind this function to the useEffect hook, so that it fires only when leagueID changes (using onClick handlers on the buttons). It sends the leagueID state, which has the ID of the selected league as a query parameter. You can find these IDs in the API's documentation. Once the response is received, it is stored in the league state.

→ FINAL STEP

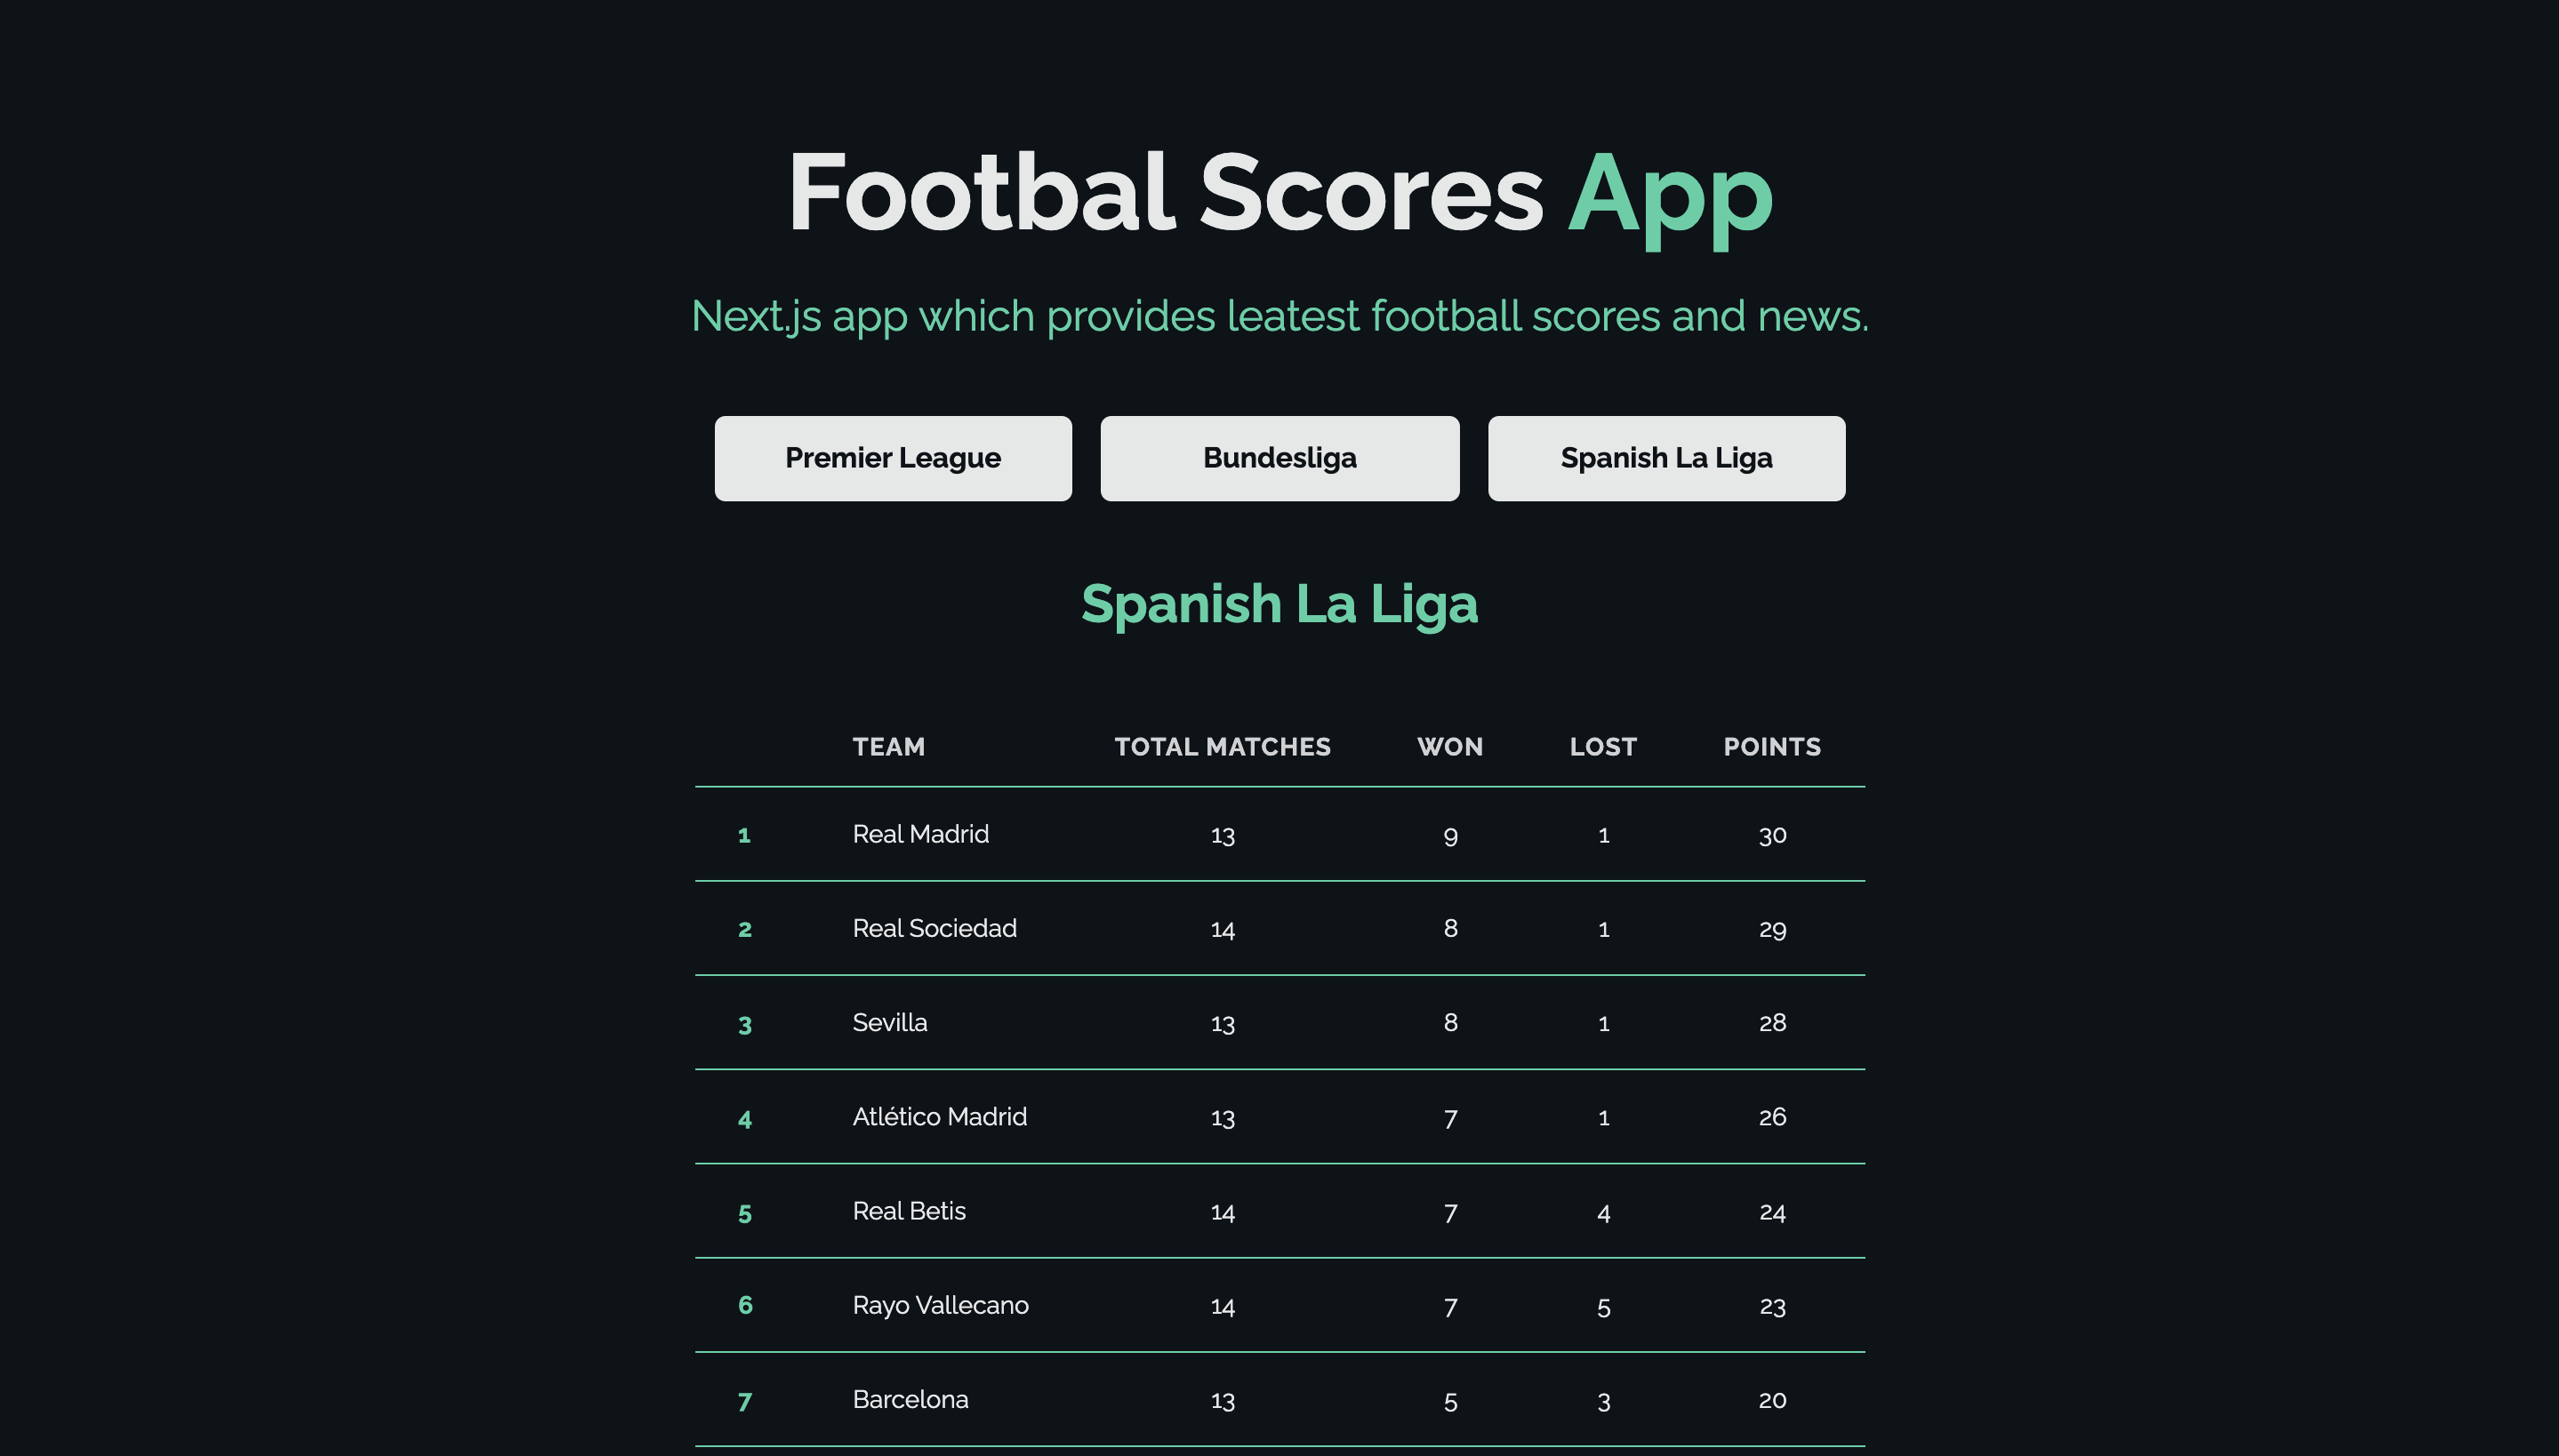
In the final step, we will display the response. Since we use the League Table endpoint, we will display the scores in a table. We have the response object in the league state, which has a child teams. It is an array of objects having scores of each team in the league. We will map to our table entries as follows:

js
import axios from 'axios';
import {useState, useEffect} from 'react';
export default function Home() {
const [league, setLeague] = useState(null);
const [leagueID, setLeagueID] = useState(null);
const getLeague = async () => {
try {
const res = await axios.get('api/league/', {
params: {leagueID}
});
const {data} = res;
setLeague(data['league-table']);
} catch (error) {
console.error(error);
}
};
useEffect(() => {
getLeague();
}, [leagueID]);
return (
<div className="flex flex-col relative bg-background font-raleway items-center min-h-screen">
<h1 className="text-6xl text-primary font-bold mt-20">
Sports <span className="text-active">App</span>
</h1>
<h2 className="text-active text-2xl mt-6">
Select a league to get its data.
</h2>
<div className="mt-10 grid grid-cols-3 gap-4">
<button
class="block w-full rounded-md px-5 py-3 bg-primary text-base font-bold text-background focus:outline-none hover:bg-active sm:px-10"
onClick={() => {
setLeagueID('1');
}}
>
Premier League
</button>
<button
className="block w-full rounded-md px-5 py-3 bg-primary text-base font-bold text-background focus:outline-none hover:bg-active sm:px-10"
onClick={() => {
setLeagueID('92');
}}
>
Bundesliga
</button>
<button
className="block w-full rounded-md px-5 py-3 bg-primary text-base font-bold text-background focus:outline-none hover:bg-active sm:px-10"
onClick={() => {
setLeagueID('94');
}}
>
Spanish La Liga
</button>
</div>
{league && (
<div className="flex flex-col">
<h2 className="text-3xl my-10 text-active font-bold text-center">
{league.competition.name}
</h2>
<div className="-my-2 overflow-x-auto sm:-mx-6 lg:-mx-8">
<div className="py-2 align-middle inline-block min-w-full sm:px-6 lg:px-8">
<div className="overflow-hidden border-b border-active sm:rounded-lg">
<table className="min-w-full divide-y divide-active text-primary">
<thead className="bg-gray-50 text-primary opacity-90">
<tr>
<th
scope="col"
className="px-6 py-3 text-left text-sm font-bold uppercase tracking-wider"
>
<span className="sr-only">
Position
</span>
</th>
<th
scope="col"
className="px-6 py-3 text-left text-sm font-bold uppercase tracking-wider"
>
Team
</th>
<th
scope="col"
className="px-6 py-3 text-left text-sm font-bold uppercase tracking-wider"
>
Total Matches
</th>
<th
scope="col"
className="px-6 py-3 text-left text-sm font-bold uppercase tracking-wider"
>
Won
</th>
<th
scope="col"
className="px-6 py-3 text-left text-sm font-bold uppercase tracking-wider"
>
Lost
</th>
<th
scope="col"
className="px-6 py-3 text-left text-sm font-bold uppercase tracking-wider"
>
Points
</th>
</tr>
</thead>
<tbody className="divide-y divide-active">
{league.teams.map(team => (
<tr key={team.id}>
<td className="px-6 py-4 whitespace-nowrap text-sm text-active font-bold text-gray-900">
{team.position}
</td>
<td className="px-6 py-4 whitespace-nowrap text-sm font-medium text-gray-900">
{team.name}
</td>
<td className="px-6 py-4 whitespace-nowrap text-center text-sm ">
{team['all-matches'].played}
</td>
<td className="px-6 py-4 whitespace-nowrap text-center text-sm ">
{team['all-matches'].won}
</td>
<td className="px-6 py-4 whitespace-nowrap text-center text-sm ">
{team['all-matches'].lost}
</td>
<td className="px-6 py-4 whitespace-nowrap text-center text-sm font-medium">
{team['total-points']}
</td>
</tr>
))}
</tbody>
</table>
</div>
</div>
</div>
</div>
)}
</div>
);
}

Finally, this is what our app looks like:

Wrap Up

All done. Our sports app is ready. Like this, you can utilize the remaining endpoints to create a full-fledged sports application. Find the code of this web app here.