Introduction
This tutorial will show you how to use JavaScript to call an API to send e-mails. We will be using the Web API from SendGrid since it is free to send up to fifty (50) e-mails per day. We will be using Node on the command line for accessing the API with JavaScript, instead of the browser, to avoid any browser limitations.
Accessing an API is kind of like accessing a webpage except the API responds back just with the data we requested: no images, no style-sheets, no script; just the data. Sometimes we may get back nothing, for example when we want to send an e-mail.
We’ll get into the details as we progress thru this tutorial but first let’s make sure you’re properly set up.
Prerequisites
To take full advantage of this tutorial you will need to have the following:
Node.jsJavaScript runtime (version10.13or later)Yarnpackage manager (ornpm)- Terminal app (to run a shell / command line)
- IDE or text editor (to edit code)
- A basic understanding of programming
- Some experience with JavaScript
Note: the instructions given here for the command line are going to be from a Linux point of view but any forward-slash / based shell should work fine, for example: bash.
Legend
Symbols and formatting you will find in this document:
Command: This is something you type into the terminal.
Output: This is something your command will output in the terminal.
Note: This is a note about the current topic being discussed.
Code text: This is a key phrase that we have in our script files, or other system location.
Source file:

  This is content we have in one of the files of our application.

  Notice the buttons in the upper right corner of this block.
Quote: This is usually something that is quoted from referenced material.
Setup
Before we get to use the API with JavaScript we need to set up our environment.
Node.js
Node is the JavaScript runtime engine that powers the development server.
To see if you have it installed, run this command in a shell:
node -v
It should come back with a version number:
v12.18.3
Otherwise you can download and install it from: nodejs.org.
Yarn
Yarn is a package manager that can control what software libraries your project installs and maintains. If you don’t have it and can’t install it and know how to use npm, you can use that instead of Yarn.
To see if you have Yarn installed, run this command in a shell:
yarn -v
It should come back with a version number:
1.22.5
Otherwise you can download and install it from: yarnpkg.com.
Note: Yarn 1 id preferred over Yarn 2 until the bugs in the newer version can be worked out.
Step 0. Signup with RapidAPI
Like most API services on the Internet we are required to obtain an API Key. We supply this key to the provider’s endpoints with every request. This is used to track us to make sure we are abiding by their Terms Of Service. Basically they want to make sure we’re not spamming them too quickly.
The easiest way to get started is to open up a web browser, signup for a free account with RapidAPI and head over to the dashboard.
Note: It is also possible to signup and test directly with SendGrid.
Click on the blue Subscribe to Test button on the RapidAPI dashboard and select the Basic (free) plan:
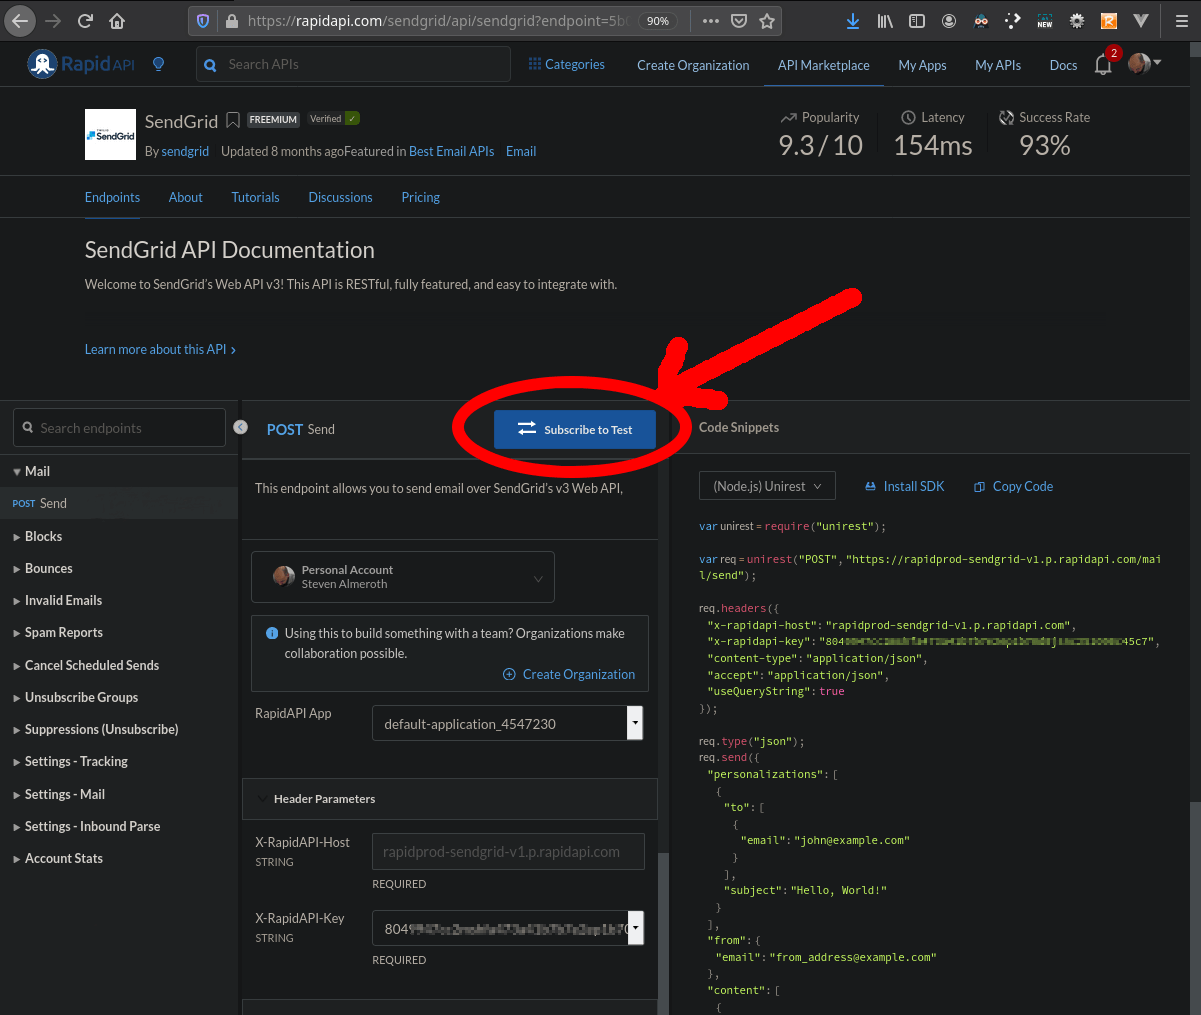
Note: Keep your X-RapidAPI-Key somewhere handy as we will need it for later. You can copy it from the Code Snippets tab.
Test the API
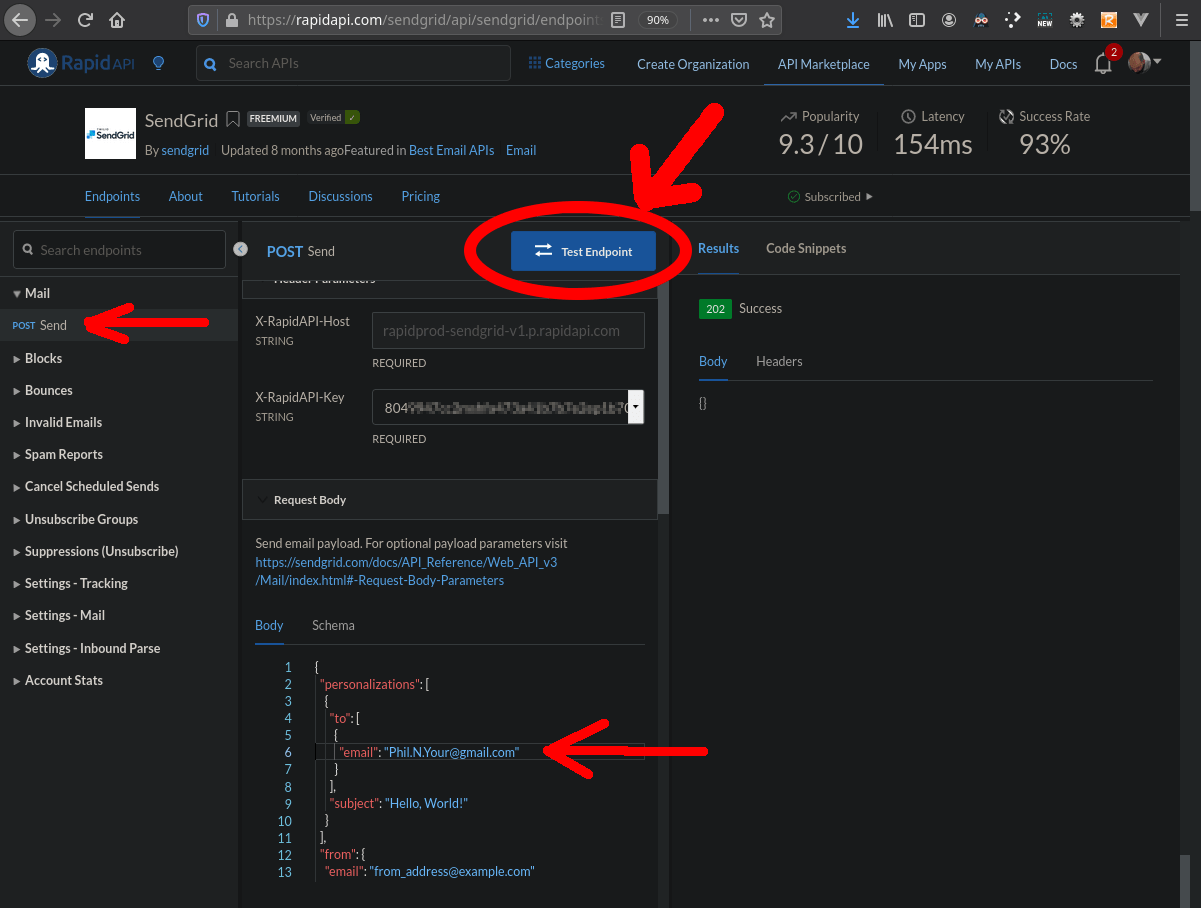
The API endpoint we want is Send. When we make a call to this endpoint with the proper information then an e-mail will be sent to the designated recipient. Fill in the "personalizations" data in the Request Body section. The only thing you really need to fill in is the first "email" field.
Step 1. Test in Browser
Press the big blue Test Endpoint button and if you get back a 202 response then check for the e-mail that was just sent.
Note: It should normally take only a few seconds to send the message; but, if you don’t get any e-mail within a minute then check your spam and also check to make sure you typed in the correct address.
Step 2. Test on Command Line
Now we’re ready to test it out on the command line. In the Code Snippets tab: go to the code selector drop-down and select (Shell) cURL then click Copy Code.
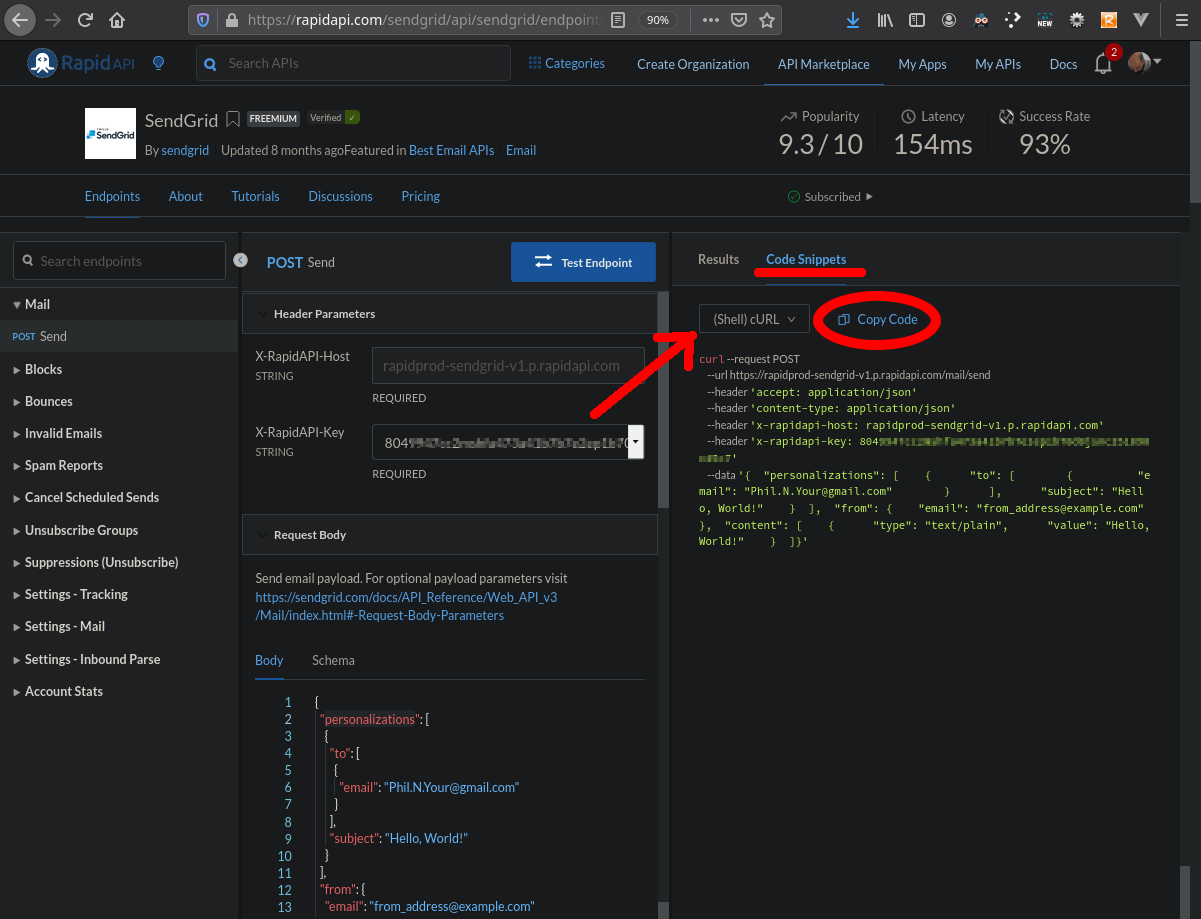
Paste the code you just copied into your terminal and press enter to run it.
curl --request POST \
	--url https://rapidprod-sendgrid-v1.p.rapidapi.com/mail/send \
	--header 'accept: application/json' \
	--header 'content-type: application/json' \
	--header 'x-rapidapi-host: rapidprod-sendgrid-v1.p.rapidapi.com' \
	--header 'x-rapidapi-key: 804.................5c7' \
	--data '{  "personalizations": [    {      "to": [        {          "email": "Phil.N.Your@gmail.com"        }      ],      "subject": "Hello, World!"    }  ],  "from": {    "email": "from_address@example.com"  },  "content": [    {      "type": "text/plain",      "value": "Hello, World!"    }  ]}'
Note: You should paste in the code you copied from your browser because the one above does not contain a valid key.
Unless you add the -i flag (or unless you got an error) you should get back no visible response from this curl command. This means the status code returned was in the 200 range, probably a 202 status which means “Accepted” and the e-mail message was successfully sent. So now check your normal e-mail to see if you got the message. You can find more information on the details page.
Access API with JavaScript
We tested it with the browser. We tested it with the command line. Now we’re going to test the same API with JavaScript.
Let’s create a JavaScript file that we can run from the command line.
Step 3. Create npm package
Before we create our JavaScript file let’s create a new directory to put it in. We can designate this new directory as an npm package if we also create the special configuration file called package.json.
Note: You can work in the default directory that your terminal application opens up in, which is probably your Home directory. If you want you can also navigate to where you keep your projects.
Let’s call our new package email.
Open a terminal and create the directory:
mkdir email
Then we enter into it:
cd email
Now initialize our new npm package:
npm init -y
Wrote to email/package.json:
{
  "name": "email",
  "version": "1.0.0",
  "description": "",
  "main": "index.js",
  "scripts": {
    "test": "echo \"Error: no test specified\" && exit 1"
  },
  "keywords": [],
  "author": "",
  "license": "ISC"
}
This command created a package.json file which contains the package configuration.
Note: The following is NOT an error but instead it is a message to give to the user (us) if we try to run the “test” script; since, we have no tests yet:
"test": "echo \"Error: no test specified\" && exit 1"
Step 4. Add Network Client
There are many ways to access an Internet API with JavaScript, for example: Http, Request, Unirest, Axios, etc. We will use Axios. We will also now use yarn to manage our package and add the axios dependency:
yarn add axios
yarn add v1.22.5
info No lockfile found.
[1/4] Resolving packages...
[2/4] Fetching packages...
[3/4] Linking dependencies...
[4/4] Building fresh packages...
success Saved lockfile.
success Saved 2 new dependencies.
info Direct dependencies
└─ axios@0.20.0
info All dependencies
├─ axios@0.20.0
└─ follow-redirects@1.13.0
Done in 0.73s.
Note: If you would like a deeper dive into using Axios then be sure to check out Jarrett Retz’s tutorial How to Display API Data Using Axios with React.
Step 5. Copy Sample Code
Now let’s copy the sample code from our SendGrid dashboard to a new file which we will then run to call the API to send an e-mail.
Back in the browser make sure you have entered your e-mail address in the first (to) “email” field in the “personalizations” data in the Request Body section. Then under the Code Snippets tab: go to the code selector drop-down and select (Node.js) Axios and click Copy Code:
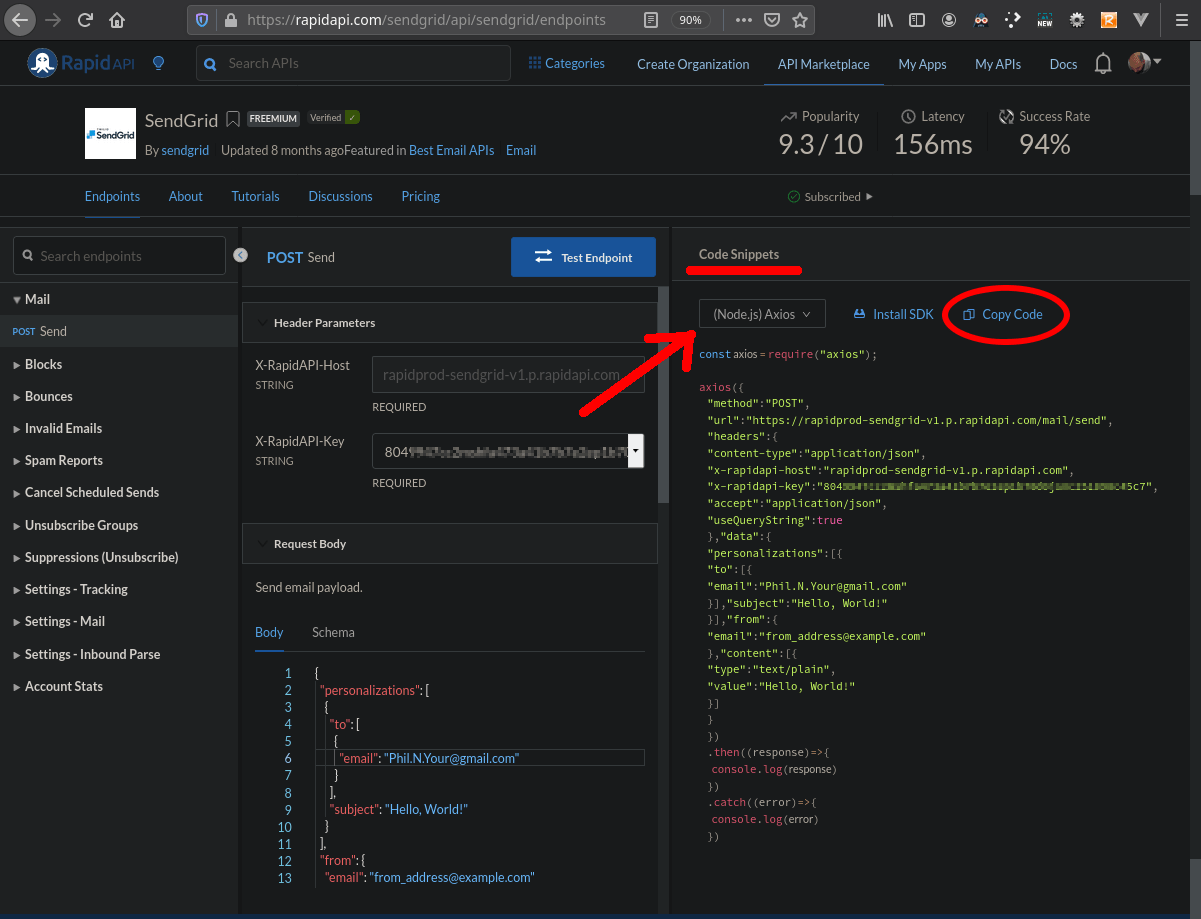
Create a new file called send.js in our email directory and paste in the code you just copied; or even better, type it all in manually:
const axios = require("axios");

axios({
    "method":"POST",
    "url":"https://rapidprod-sendgrid-v1.p.rapidapi.com/mail/send",
    "headers":{
    "content-type":"application/json",
    "x-rapidapi-host":"rapidprod-sendgrid-v1.p.rapidapi.com",
    "x-rapidapi-key":"804.......5c7",
    "accept":"application/json",
    "useQueryString":true
    },"data":{
    "personalizations":[{
    "to":[{
    "email":"Phil.N.Your@gmail.com"
    }],"subject":"Hello, World!"
    }],"from":{
    "email":"from_address@example.com"
    },"content":[{
    "type":"text/plain",
    "value":"Hello, World!"
    }]
    }
    })
    .then((response)=>{
      console.log(response)
    })
    .catch((error)=>{
      console.log(error)
    })
Step 6. Run Sample Code
Now let’s run it.
Note: Since we’re accessing the API with JavaScript care needs to be taken so that we don’t run the script too many times in one day while we’re practicing. Remember the free plan only includes fifty (50) requests per day at the time of this writing. You can see your usage statistics on your Developer Dashboard.
Back in the terminal run our script with node:
node send.js
{
status: 202,
statusText: 'Accepted',
...
[Symbol(kOutHeaders)]: [Object: null prototype] {
accept: [Array],
'content-type': [Array],
'x-rapidapi-host': [Array],
'x-rapidapi-key': [Array],
usequerystring: [Array],
'user-agent': [Array],
'content-length': [Array],
host: [Array]
}
},
data: ''
}
After you type in this command and press enter; hopefully, SendGrid will get your request and fire off an e-mail for you. Now’s the time to check and see if you got it.
There’s a little too much information we’re logging to the console from the response we get back; actually, we’re logging the entire response object. Since more is not always better, let’s just log the important bits. Also let’s clean up the code a little with some proper formatting:
const axios = require("axios");

axios({
  "method": "POST",
  "url": "https://rapidprod-sendgrid-v1.p.rapidapi.com/mail/send",
  "headers": {
    "content-type": "application/json",
    "x-rapidapi-host": "rapidprod-sendgrid-v1.p.rapidapi.com",
    "x-rapidapi-key": "804.............5c7",
    "accept": "application/json",
    "useQueryString": true
  },
  "data": {
    "personalizations": [
      {
        "to": [
          {
            "email": "Phil.N.Your@gmail.com"
          }
        ],
        "subject": "Hello, World!"
      }
    ],
    "from": {
      "email": "from_address@example.com"
    },
    "content": [
      {
        "type": "text/plain",
        "value": "Hello, World!"
      }
    ]
  }
})
.then((r)=>{
  console.log(r.status, r.statusText, r.headers)
})
.catch((error)=>{
  console.log(error)
})
Note: If you want to enhance the learning experience then instead of copy/paste, actually type in the code manually; it makes you think more. With that said if you do decide to copy & paste, remember that the code above does not have a valid API key so you will have to enter your x-rapidapi-key manually.
node send.js
202 Accepted {
  'access-control-allow-headers': 'Authorization, Content-Type, On-behalf-of, x-sg-elas-acl',
  'access-control-allow-methods': 'POST',
  'access-control-allow-origin': 'https://sendgrid.api-docs.io',
  'access-control-max-age': '600',
  'content-type': 'text/plain; charset=UTF-8',
  date: 'Sun, 06 Sep 2020 21:27:14 GMT',
  server: 'RapidAPI-1.2.2',
  'x-message-id': 'BqTsjbKXSQeR45galtjWzg',
  'x-no-cors-reason': 'https://sendgrid.com/docs/Classroom/Basics/API/cors.html',
  'x-rapidapi-region': 'AWS - us-east-1',
  'x-rapidapi-version': '1.2.2',
  'x-ratelimit-emails-limit': '50',
  'x-ratelimit-emails-remaining': '41',
  'content-length': '0',
  connection: 'Close'
}
That looks better.
Bonus: User Interface
Let’s create a quick web server with Express and a web page to be a user interface.
Step 7. Add Express Server
Running a web server from the command line is easy:
- install express,
- create the script,
- run the server.
7.1 – Install Express
Use Yarn to add Express Dependency:
yarn add express
yarn add v1.22.5
[1/4] Resolving packages...
[2/4] Fetching packages...
[3/4] Linking dependencies...
[4/4] Building fresh packages...
success Saved lockfile.
success Saved 29 new dependencies.
info Direct dependencies
└─ express@4.17.1
...
Done in 2.59s.
7.2 Create the Script
Create a file called server.js in our email directory and copy the following:
const express = require('express')
const app = express()
const port = 3000

app.get('/', (req, res) => {
  res.send('Hello World!')
})

app.listen(port, () => {
  console.log(`Example app listening at http://localhost:${port}`)
})
This app starts a server and listens on port 3000 for connections. The app responds with “Hello World!” for requests to the root URL (/) or route. For every other path, it will respond with a 404 Not Found. —expressjs.com
7.3 Run the Server
Use Node to run the web server script:
node server.js
Example app listening at http://localhost:3000
Now test it in the browser by visiting localhost on port 3000:
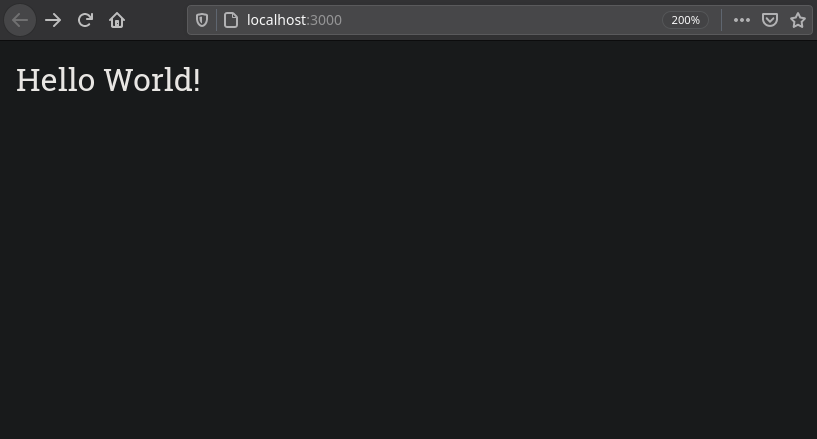
If you see “Hello World!” in the browser then you have setup Express correctly.
Step 8. Add API GET endpoint
We are going to script our own API endpoint to handle GET method requests. This endpoint will do the communication with the RapidAPI endpoint which then, in-turn will talk to the SendGrid API endpoint.
We will add:
- configuration file,
- API handler module,
- route handler for GET requests.
Then reboot the server:
- cycle the server.
8.1 – Add Configuration File
Create a JSON file to hold our request configuration:
{
  "method": "POST",
  "url": "https://rapidprod-sendgrid-v1.p.rapidapi.com/mail/send",
  "headers": {
    "content-type": "application/json",
    "x-rapidapi-host": "rapidprod-sendgrid-v1.p.rapidapi.com",
    "x-rapidapi-key": "804.................5c7",
    "accept": "application/json",
    "useQueryString": true
  },
  "data": {
    "personalizations": [
      {
        "to": [
          {
            "email": "Phil.N.Your@gmail.com"
          }
        ],
        "subject": "Hello, World!"
      }
    ],
    "from": {
      "email": "from_address@example.com"
    },
    "content": [
      {
        "type": "text/plain",
        "value": "Hello, World!"
      }
    ]
  }
}
Note: Again, make sure to enter your x-rapidapi-key and a valid (to) email that you can check and verify.
8.2 – Add API Handler Module
Let’s convert our send.js file to a CommonJS module that we can import from the server. Let’s also add in some error handling if we catch any errors:
const axios = require("axios");

module.exports = async function (config) {
  try {
    const r = await axios(config);
    return `${r.status} (${r.statusText}) emails remaining: ${r.headers['x-ratelimit-emails-remaining']}`
  }
  catch (error) {
    if (error.response) {
      // The request was made and the server responded with a status code
      // that falls out of the range of 2xx
      console.log(error.response.status, error.response.data.message)
      console.log('Response', error.response.headers)
      console.log('Request', error.config)
    } else if (error.request) {
      // The request was made but no response was received
      console.log(error.request)
    } else {
      // Something happened in setting up the request that triggered an Error
      console.log(error)
    }
  }
}
8.3 – Add Route Handler for GET Requests
Now let’s import our new files into our server script and create the GET /api/send endpoint:
const express = require('express')
const sendMail = require('./send')
const config = require('./config.json')

const server = express()
const port = 3000

server.get('/', (req, res) => {
  res.send('Hello World!')
})

server.get('/api/send', async (req, res) => {
  const r = await sendMail(config)
  res.send(r)
})

server.listen(port, () => {
  console.log(`Server listening at http://localhost:${port}`)
})
8.4 – Cycle the server
Cycling the server means stopping our web server and then restarting it again. If you still have the server running in the terminal then stop it with Ctrl-C (Cmd-C on Mac) and then start it again:
node server.js
Example app listening at http://localhost:3000
Note: Anytime you make changes to any server file: server.js, send.js, config.json; then you will need to cycle the server.
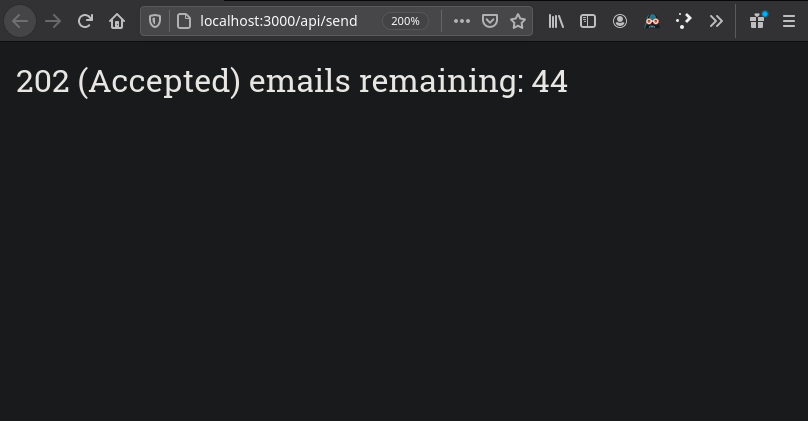
Then visit the new API endpoint in the browser localhost on port 3000/api/send and it should send us an email:
Step 9. Add API POST Endpoint
We are now going to create a simple HTML file to submit data to a new POST method endpoint. This new API endpoint will have the same path as the previous endpoint we just created, namely /api/send. But instead of handling GET requests this new endpoint will handle POST requests.
We will add a new:
- HTML file,
- style-sheet,
- endpoint to our server script.
Then pull up the UI:
- cycle the server,
- render UI in browser.
9.1 – Add New HTML File
Let’s create a new directory called client and add an index.html file inside which will be our user interface:
<!DOCTYPE html>
<!-- Markup taken from https://www.sanwebe.com/2014/08/css-html-forms-designs -->
<html lang="en-US">
  <head>
    <meta charset="UTF-8" />
    <meta name="viewport" content="width=device-width, initial-scale=1" />
    <title>SendGrid User Interface</title>
    <link rel=stylesheet href="index.css" />
  </head>
  <body>
    <div class="form-style-2">
      <div class="form-style-2-heading"> Provide any information you want to override config.json </div>
      <form action="http://localhost:3000/api/send" method="post">
        <label for="from-email">
          <span> From Email </span>
          <input type="text" class="input-field" id="from-email" name="fromEmail" />
        </label>
        <label for="to-email">
          <span> To Email </span>
          <input type="text" class="input-field" id="to-email" name="toEmail" />
        </label>
        <label for="subject">
          <span> Subject </span>
          <input type="text" class="input-field" id="subject" name="subject" />
        </label>
        <label for="content">
          <span> Message </span>
          <textarea id="content" name="content" class="textarea-field"></textarea>
        </label>
        <label><span></span><input type="submit" value="Submit" /></label>
      </form>
    </div>
  </body>
</html>
9.2 – Add New Stylesheet
Add index.css also in our client directory:
.form-style-2{
  max-width: 500px;
  padding: 20px 12px 10px 20px;
  font: 13px Arial, Helvetica, sans-serif;
}
.form-style-2-heading{
  font-weight: bold;
  font-style: italic;
  border-bottom: 2px solid #ddd;
  margin-bottom: 20px;
  font-size: 15px;
  padding-bottom: 3px;
}
.form-style-2 label{
  display: block;
  margin: 0px 0px 15px 0px;
}
.form-style-2 label > span{
  width: 100px;
  font-weight: bold;
  float: left;
  padding-top: 8px;
  padding-right: 5px;
}
.form-style-2 span.required{
  color:red;
}
.form-style-2 .tel-number-field{
  width: 40px;
  text-align: center;
}
.form-style-2 input.input-field, .form-style-2 .select-field{
  width: 48%;
}
.form-style-2 input.input-field,
.form-style-2 .tel-number-field,
.form-style-2 .textarea-field,
  .form-style-2 .select-field{
  box-sizing: border-box;
  -webkit-box-sizing: border-box;
  -moz-box-sizing: border-box;
  border: 1px solid #C2C2C2;
  box-shadow: 1px 1px 4px #EBEBEB;
  -moz-box-shadow: 1px 1px 4px #EBEBEB;
  -webkit-box-shadow: 1px 1px 4px #EBEBEB;
  border-radius: 3px;
  -webkit-border-radius: 3px;
  -moz-border-radius: 3px;
  padding: 7px;
  outline: none;
}
.form-style-2 .input-field:focus,
.form-style-2 .tel-number-field:focus,
.form-style-2 .textarea-field:focus,
.form-style-2 .select-field:focus{
  border: 1px solid #0C0;
}
.form-style-2 .textarea-field{
  height:100px;
  width: 55%;
}
.form-style-2 input[type=submit],
.form-style-2 input[type=button]{
  border: none;
  padding: 8px 15px 8px 15px;
  background: #FF8500;
  color: #fff;
  box-shadow: 1px 1px 4px #DADADA;
  -moz-box-shadow: 1px 1px 4px #DADADA;
  -webkit-box-shadow: 1px 1px 4px #DADADA;
  border-radius: 3px;
  -webkit-border-radius: 3px;
  -moz-border-radius: 3px;
}
.form-style-2 input[type=submit]:hover,
.form-style-2 input[type=button]:hover{
  background: #EA7B00;
  color: #fff;
}
9.3 – Add New API Endpoint
Lastly add the new POST endpoint and an Express plugin to handle the encoded data in the request body:
const express = require('express')
const sendMail = require('./send')
const config = require('./config.json')

const server = express()
const port = 3000

// for parsing application/x-www-form-urlencoded
server.use(express.urlencoded({ extended: true }))

server.get('/', (req, res) => {
  res.send('Hello World!')
})

server.get('/api/send', async (req, res) => {
  const r = await sendMail(config)
  res.send(r)
})

server.post('/api/send', async (req, res) => {
  if (req.body.fromEmail.trim()) {
    config.data.from.email = req.body.fromEmail
  }
  if (req.body.toEmail.trim()) {
    config.data.personalizations[0].to[0].email = req.body.toEmail
  }
  if (req.body.subject.trim()) {
    config.data.personalizations[0].subject = req.body.subject
  }
  if (req.body.content.trim()) {
    config.data.content[0].value = req.body.content
  }
  const r = await sendMail(config)
  res.send(r)
})

server.listen(port, () => {
  console.log(`Server listening at http://localhost:${port}`)
})
9.4 – Cycle the Server
Stop/Start the server like we did before.
9.5 – Render the UI in a Browser
Now pull up the index.html file in a browser.
Note: Just double-click the file from your file manager or drag it onto a web browser to display it. Using the file protocol (and not http) should be fine since the server is localhost. If you want you can also spin up another web server in another terminal to serve it up; for example: python3 -m http.server.
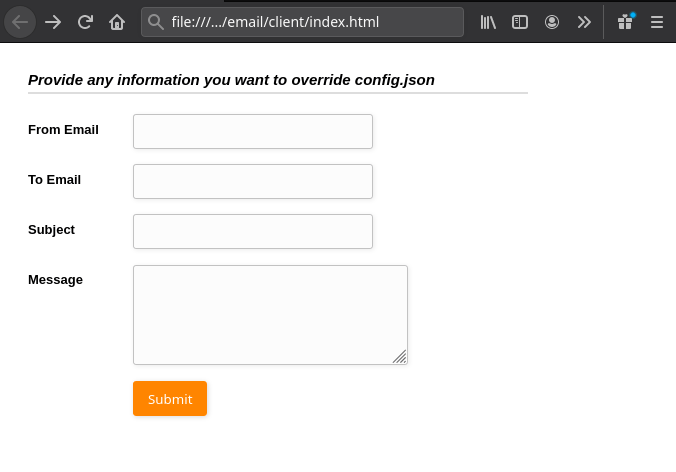
When you hit the Submit button any data you have entered in will override the values in config.json and the appropriate email should be sent.
Wrapping Up
I hope you enjoyed this tutorial and perhaps learned something about how to use an API with JavaScript to send emails with SendGrid. It would be good to enhance the UI to also submit more configuration data based on what SendGrid accepts. If you have any questions be sure to leave them in the comments below.
GitHub Project
If you would like to see the final version of the project have a look at this GitHub repository.
FAQ
How much does sending an e-mail cost?
The RapidAPI SendGrid API allows for 50 e-mails per day for free. After that each additional e-mail costs a tenth of a penny at the time of this writring. To check the current pricing, check the pricing page: https://rapidapi.com/sendgrid/api/sendgrid/pricing
Can I send to multiple recipients at once?
Yes. The personalizations.to field is a list so you can enter as many as you'd like.
What happends if I get an error?
Post your error in the comments and we'll try to get it sorted out.
Leave a Reply